Showing posts with label cheesy. Show all posts

Saturday, September 26, 2015

Sweet and Cheesy Jalapeno Chicken Wontons

Sometimes you have an idea for a recipe in your head and it just doesn't work out. In your mind, the ingredients complement each other perfectly, but when you actually create it, the flavors don't mesh and you wind up with a mess on a plate. Sometimes recipe ideas just don't work out.

But sometimes they do.


One of my friends recently had a Tastefully Simple party. Have you ever been to one of those? I love their products (the beer bread is to DIE for). Most of their mixes and dips require just one or two additional ingredients (hence the "simple" in the name). Anyway, when I was flipping through the catalog I came across this Sweet Pepper Jalapeno Jam and had to buy it.


I've had sweet pepper jelly before. It's amazing with crackers and cream cheese. And in wontons.

After I bought the jelly, I was brainstorming ways to use it. I knew I wanted to pair it with cream cheese, but wasn't sure what else. Then it came to me. Chicken. And onions. And wanton wrappers. Boom.

This recipe is only a few ingredients, but it does involve a little more preparation than some of the other recipes I've posted. Not much more, though. It's definitely worth it.

I cook the chicken by poaching it. You need to shred it for this recipe, and I find it's easier to shred when it's poached. I didn't add any spices to the chicken, but you can.


Once it's shredded, add it to a bowl. Combine with the onions, jelly, and cream cheese.


Next comes the moderately time-consuming part: stuffing and sealing the wontons. Start by placing a wonton on a clean, dry surface (like a cutting board). Scoop about a 1/2 tbsp onto the center of the wonton - be careful not to scoop too much, or else it will be really tough to seal the wrapper.

Once the filling is on the wonton, fold it in half so it's triangle-shaped, with the filling sealed inside. Moisten your fingers (it helps to keep a small cup of water next to where you're working) and press down on the edges of the wrapper to seal them. You can cook them like this, or press the two bottom corners together to get that wonton shape (and moisten and press to seal) and cook that way.


Spray a baking sheet with no-calorie nonstick spray. Arrange the wontons on the sheet, spray the tops with nonstick spray, and bake at 400 degrees. After 5 minutes, flip the wontons and bake for another 4 minutes.

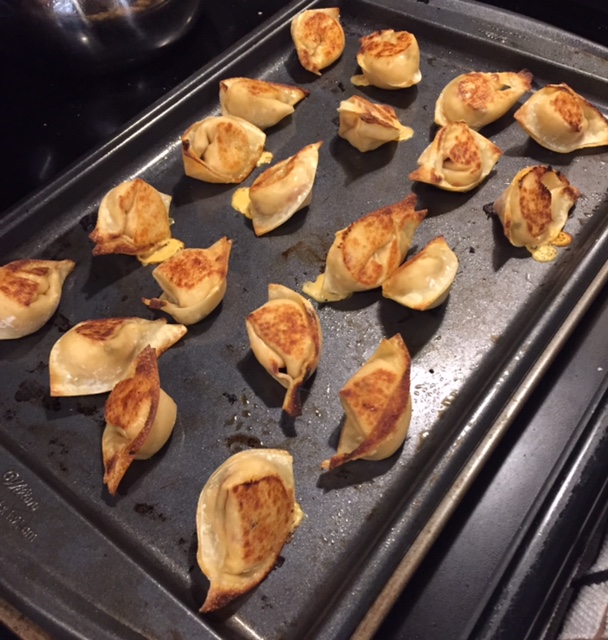


Enjoy! Serve warm, either plain or with sweet Asian chili sauce.

Until next time!

Ingredients

  • 1 boneless, skinless chicken breast, cooked and shredded (about 4.5-5 oz)
  • 1/4 cup finely chopped sweet onion
  • 3 tbsp sweet pepper jelly (I use Tastefully Simple, but you can use any brand)
  • 3 tbsp fat free cream cheese
  • 20 wonton wrappers (I use the ones by Nasoya - check the produce or tofu section at the grocery store)

Serving size: 4 wontons
Weight Watchers PointsPlus value: 3

Instructions

  1. Preheat the oven to 400 degrees.
  2. In a small bowl, combine the shredded chicken, onion, jelly, and cream cheese.
  3. Lay a wonton wrapper on a clean, dry surface. Scoop 1/2 tbsp of the chicken mixture onto the center of the wrapper (be sure not to overfill, or else it will be difficult to seal). Fold the wrapper in half to seal the filling inside. 
  4. Moisten the tips of your fingers and press the edges of the wrapper to seal. If you want to, you can then press and seal the two bottom corners together to give it a wonton shape (this isn't necessary, though - you can cook it in the triangle shape, too).
  5. Repeat for the remaining wrappers.
  6. Spray a baking sheet with no-calorie nonstick spray. Arrange the wontons on the baking sheet and spray the tops lightly with nonstick spray.
  7. Bake for 5 minutes, then remove from the oven, flip, and bake for an additional 4 minutes.
  8. Serve warm, either plain or with sweet Asian chili sauce.


Nutrition


Saturday, April 25, 2015

Chicken Stuffed with Spinach, Ricotta, and Sun-Dried Tomatoes

Hi guys. Me again. And I brought a friend, Spinach and Ricotta. Remember him? He's awesome. But this time, he brought Sun-Dried Tomatoes along and let me tell you, three is most definitely NOT a crowd with this group.


This recipe is so easy and delicious. It's perfect for a quick after-work dinner or to make over the weekend and refrigerate for lunches for the week. I've made a lot of chicken in my lifetime, but I think I can officially say this will be my new go-to recipe.

It's really easy too, you guys. You just need to cut your chicken breasts in half lengthwise, mix up your filling, and spread it on the chicken. Cutting chicken breasts lengthwise isn't the easiest thing to do, but you'll be okay if you use a sharp knife. I promise. Also, it doesn't have to be perfect. Just cut them in half lengthwise as best as you can.

 PRE-CUT CHICKEN BREASTS
CHICKEN BREASTS HALVED LENGTHWISE

Then, mix up your filling. It's important to use sun-dried tomatoes that are NOT in oil. It's much healthier this way.


Then just spread the filling across the chicken halves, top with the other halves, and bake!


The end result? Perfectly cooked chicken with a warm, cheesy, spinachy (I'm officially making "spinachy" a word - I'm an editor, pretty sure I can do that) filling.


Ta-da! I made this for the first time a few days ago and sent a picture to my friend since I knew she loved the Spinach and Ricotta English Muffin Pizzas I posted a few weeks ago. I know she'll be making this, and I'd love to know if you try it, too!

Until next time!


Ingredients

  • 4 5-oz boneless, skinless chicken breasts (I use Perdue Perfect Portions)
  • 1/2 cup part skin ricotta cheese
  • 1/2 cup frozen chopped spinach, cooked according to package instructions (TIP: I cook the whole package [9 or 10 oz, depending on the brand] and just store the leftovers in a tupperware in the refrigerator)
  • 6 sun-dried tomato halves, not in oil, chopped
  • 1/4 cup grated pecorino Romano cheese (or grated parmesan cheese)
  • Salt, pepper, and garlic powder (to taste)

Serving size: One stuffed chicken breast
Weight Watchers PointsPlus value: 5


Instructions

  1. Preheat the oven to 400 degrees. Spray a baking sheet with nonstick, no-calorie cooking spray and set aside.
  2. Using a very sharp knife, carefully halve the chicken breasts lengthwise. If the chicken isn’t very thick, this will be difficult, but doable. If you don’t get the halves exactly even, it’s fine. Close enough is fine – we’re not striving for perfection here.
  3. In a medium mixing bowl, combine the ricotta, spinach, sun-dried tomatoes, and grated cheese. Season with salt, pepper, and garlic powder and mix to combine.
  4. From the chicken breast halves, take the four larger halves and arrange them on the baking sheet. Distribute the spinach mixture evenly across all four halves, then top with the smaller halves.
  5. Bake for 15 minutes at 400 degrees. Let the chicken cool slightly (just a couple of minutes) before serving.

Nutritional Information


Sunday, April 19, 2015

Lightened-Up Carbonara Pasta

This dish right here is the definition of a happy accident. I hadn't gone food shopping this week and worked late a few nights and needed to make something quick. I boiled some pasta and was rummaging through my fridge to see what I could add to it. I had some bacon, an onion, and a pepper. I found some peas in the freezer, added a makeshift cheese "sauce," and was pleasantly surprised with the outcome.


It wasn't until later that I realized it resembled a carbonara. I knew I needed to add it to the blog.

It's really quite easy to make. Start by chopping and cooking your veggies.


While they're cooking, prepare the pasta. Add the cheese wedges and mix - this will serve as your "sauce."


Now, I'm not a professionally trained chef (shocking, I know). I make meals that are easy, tasty, and diet-friendly. Maybe one day I'll learn how to cook a real, professional sauce but until then, these The Laughing Cow cheese wedges work just fine.

When the veggies are done, add them to the pasta and stir to combine.


If your cheese wedges didn't melt fully before, they'll definitely melt when you add the hot, cooked veggies and stir. 

Next up, BACON. I never liked bacon as a kid, but as an adult I've developed a taste for it. I'm late to the game, I know. But the point is, I like it now and I use it in lots of recipes and it really just takes them from good to great. For this recipe, cook the bacon, then crumble it over the pasta and stir to combine.


Finally, add the grated cheese, season with salt and pepper, and BOOM. Lightened-up carbonara pasta. 

I made this tonight (Sunday) and plan on bringing it to work for lunch this week. It can be microwaved and eaten hot, or eaten cold as a pasta salad - it's great both ways.

As always, feedback is appreciated!

Until next time!

Ingredients

  • 12 oz (1 box) shell pasta, cooked according to package instructions
  • 1 medium green bell pepper, finely chopped
  • 1 medium onion, finely chopped
  • 1 cup frozen peas
  • 5 wedges The Laughing Cow Light Creamy Swiss cheese
  • 10 slices Oscar Mayer center cut bacon (or brand of your choice)
  • 1/4 cup grated parmesan cheese
  • Salt and pepper (to taste)


Serving size: 1/5 of recipe
Weight Watchers PointsPlus value: 9

Instructions

  1. Spray a large frying pan or skillet with no-calorie nonstick cooking spray. Place it on the stove on medium/high heat and add the green pepper, onion, and peas. Stirring occasionally, cook until the veggies are soft and slightly brown, about 10-12 minutes. (Note: It saves time if you cook the pasta while the veggies are cooking).
  2. When the pasta is cooked, drain it and then transfer to a large bowl.
  3. While the pasta is still hot, add the cheese wedges to the bowl and stir immediately to melt and combine. If the cheese doesn’t melt fully, don’t worry – you’ll stir again after you add the cooked veggies.
  4. When the vegetables are done cooking, add them to the pasta and stir to combine.
  5. Cook the bacon according to package instructions (I always microwave mine, it’s fastest and easiest). Crumble the bacon over the pasta and then stir to combine (I usually just wait until the bacon cools off and then break it into pieces with my fingers).
  6. Add the grated cheese and stir to combine. Season with salt and pepper, give it one final stir, and serve!


Nutritional Information