Showing posts with label snack. Show all posts

Saturday, September 26, 2015

Sweet and Cheesy Jalapeno Chicken Wontons

Sometimes you have an idea for a recipe in your head and it just doesn't work out. In your mind, the ingredients complement each other perfectly, but when you actually create it, the flavors don't mesh and you wind up with a mess on a plate. Sometimes recipe ideas just don't work out.

But sometimes they do.


One of my friends recently had a Tastefully Simple party. Have you ever been to one of those? I love their products (the beer bread is to DIE for). Most of their mixes and dips require just one or two additional ingredients (hence the "simple" in the name). Anyway, when I was flipping through the catalog I came across this Sweet Pepper Jalapeno Jam and had to buy it.


I've had sweet pepper jelly before. It's amazing with crackers and cream cheese. And in wontons.

After I bought the jelly, I was brainstorming ways to use it. I knew I wanted to pair it with cream cheese, but wasn't sure what else. Then it came to me. Chicken. And onions. And wanton wrappers. Boom.

This recipe is only a few ingredients, but it does involve a little more preparation than some of the other recipes I've posted. Not much more, though. It's definitely worth it.

I cook the chicken by poaching it. You need to shred it for this recipe, and I find it's easier to shred when it's poached. I didn't add any spices to the chicken, but you can.


Once it's shredded, add it to a bowl. Combine with the onions, jelly, and cream cheese.


Next comes the moderately time-consuming part: stuffing and sealing the wontons. Start by placing a wonton on a clean, dry surface (like a cutting board). Scoop about a 1/2 tbsp onto the center of the wonton - be careful not to scoop too much, or else it will be really tough to seal the wrapper.

Once the filling is on the wonton, fold it in half so it's triangle-shaped, with the filling sealed inside. Moisten your fingers (it helps to keep a small cup of water next to where you're working) and press down on the edges of the wrapper to seal them. You can cook them like this, or press the two bottom corners together to get that wonton shape (and moisten and press to seal) and cook that way.


Spray a baking sheet with no-calorie nonstick spray. Arrange the wontons on the sheet, spray the tops with nonstick spray, and bake at 400 degrees. After 5 minutes, flip the wontons and bake for another 4 minutes.

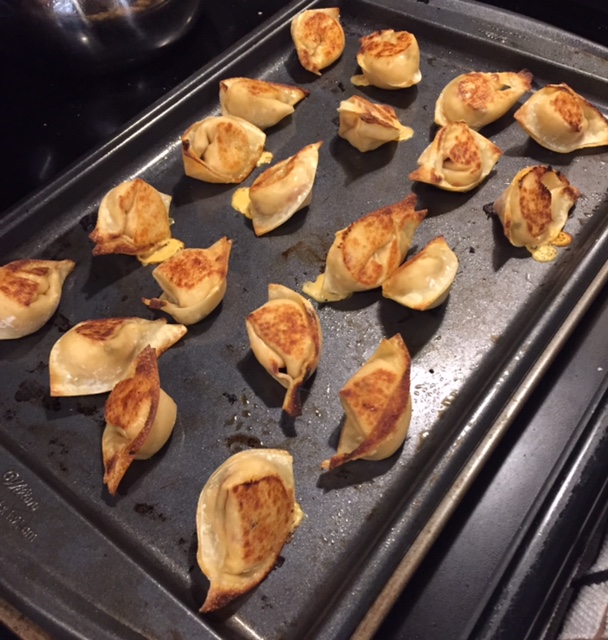


Enjoy! Serve warm, either plain or with sweet Asian chili sauce.

Until next time!

Ingredients

  • 1 boneless, skinless chicken breast, cooked and shredded (about 4.5-5 oz)
  • 1/4 cup finely chopped sweet onion
  • 3 tbsp sweet pepper jelly (I use Tastefully Simple, but you can use any brand)
  • 3 tbsp fat free cream cheese
  • 20 wonton wrappers (I use the ones by Nasoya - check the produce or tofu section at the grocery store)

Serving size: 4 wontons
Weight Watchers PointsPlus value: 3

Instructions

  1. Preheat the oven to 400 degrees.
  2. In a small bowl, combine the shredded chicken, onion, jelly, and cream cheese.
  3. Lay a wonton wrapper on a clean, dry surface. Scoop 1/2 tbsp of the chicken mixture onto the center of the wrapper (be sure not to overfill, or else it will be difficult to seal). Fold the wrapper in half to seal the filling inside. 
  4. Moisten the tips of your fingers and press the edges of the wrapper to seal. If you want to, you can then press and seal the two bottom corners together to give it a wonton shape (this isn't necessary, though - you can cook it in the triangle shape, too).
  5. Repeat for the remaining wrappers.
  6. Spray a baking sheet with no-calorie nonstick spray. Arrange the wontons on the baking sheet and spray the tops lightly with nonstick spray.
  7. Bake for 5 minutes, then remove from the oven, flip, and bake for an additional 4 minutes.
  8. Serve warm, either plain or with sweet Asian chili sauce.


Nutrition


Saturday, March 21, 2015

Meatless Taco Bites

Happy weekend everyone! Is it just me, or did this week feel like a long one? Nevermind, though - the weekend is here and I thought I'd celebrate by posting a new recipe.

This one was inspired by my sister-in-law Tracey. She makes this AMAZING meatless taco dip - seriously, it's addicting. I can't seem to remove myself from the tray whenever she serves it. I've started making it whenever I host an event, and it's always a huge hit.

I usually serve the dip with Tostitos® Scoops!®, and it's so easy to just eat scoop after scoop of the delicious dip and lose track of exactly how much you've eaten (at least that's what I do). I wanted to try to revamp the recipe a little bit into a version that was easier to divide into pre-specified servings, without losing the deliciousness Tracey designed. Enter mini fillo shells, and the taco bites were created.


These are SO easy and SO delicious, and the best part is that they're so low-calorie that you can afford to eat a whole bunch in one sitting. The secret is using mini fillo shells, which are crispy and delicious but barely add any calories to the recipe.


Apologies again for my (lack of) photography skills. Maybe I'll get better as I continue to post. For now, though, I'll just post the recipe.


Ingredients


  • 30 mini fillo shells (2 boxes)
  • 4 oz fat free cream cheese, room temperature
  • 1/3 cup fat free salsa
  • 1/4 cup low fat Greek yogurt (I used Fage Total 2%)
  • 1/4 small red bell pepper, chopped into small pieces
  • 1/4 small green bell pepper, chopped into small pieces
  • 1/4 medium tomato, chopped into small pieces (I used a plum tomato)
  • 1/2 cup reduced fat Mexican style shredded cheese

Servings: 10 servings (3 taco bites each)
Weight Watchers PointsPlus value: 2 (for 3 taco bites)


Instructions


  1. Preheat the oven to 350 degrees. Place the empty shells on a baking sheet. Bake for 3-5 minutes. Remove from oven and let cool completely before filling. Note: This is an optional step. The shells come pre-baked and ready to fill, so all you need to do is let them defrost. Baking them adds a little extra crispiness, which I like, so that's why I included it as step 1. 
  2. In a small bowl, combine the cream cheese, salsa, and yogurt. Once combined, distribute the mix evenly among the cooled-off shells. TIP: If you're like me, and you forget to leave the cream cheese out to let it get to room temperature, just stick it in the microwave for about 30 seconds. That should do the trick.
  3. Sprinkle the chopped peppers and tomato over the shells. Top it off with the cheese, and you're done! Enjoy!


Super easy, really yummy, and guaranteed to be a crowd pleaser. As always, any feedback you have would be greatly appreciated!

Until next time!

Nutritional Information