Showing posts with label bacon. Show all posts

Saturday, June 20, 2015

Skinny Chicken BLT Quesadilla

I used to be a weird person who didn't like bacon. I'm still kind of picky about it - I don't like when it's too crispy and I'd rather eat it as a part of a sandwich or inside a recipe than on its own, but I've finally come to love bacon and the flavor it brings to so many dishes.

And I absolutely love a good BLT.


For those of you who don't know, BLT stands for bacon, lettuce, tomato (just covering my grounds here)! It's usually served on a roll or wrap with a ton of mayo and it's delicious. Not the healthiest option, though.

Until now.

By using low-fat mayo, center-cut bacon, and a toasted low-cal wrap, you can eliminate a lot of the fat and calories associated with a traditional BLT. And it tastes just as good, promise! I even added some grilled chicken for extra protein and to bulk this up so it can be eaten for dinner as a meal.

Start by spreading the mayo across the wrap. Layer the lettuce, tomato, and onion across one half of the wrap. 


Next, add the bacon. I cook mine in the microwave. It's easy, fast, and eliminates splatter (nothing worse than being burnt by bacon grease while cooking on the stove). Just put a paper towel on a microwave-safe dish, place your bacon on the paper towel, and place another paper towel on top. Microwave for 60-90 seconds (depending on how crispy you like it) and then crumble it over the wrap.


Next, add the chicken. I seasoned mine with salt,.pepper, and garlic and cooked it on the Foreman grill (8-10 minutes on 375 degrees) but you could also cook it on the stove or grill it - whichever you prefer. Slice the chicken and spread it across the wrap. Sprinkle with salt and pepper.


Now, the hard part - transferring the wrap to the grill. I really recommend using a Foreman is you have one - this way both sides will be grilled at the same time. You can grill the wrap on the stove, but you'll have to keep flipping it and it might be hard to keep everything inside of it. Once it's safely on the grill, fold the half not covered in filling over the other half and let it grill!


I kept my grill on 375 and let it go for about 8 minutes. 


This definitely needs to be eaten with a knife and fork. Anything else would be way too messy! I had mine with a little fat free ranch dressing on the side for dipping, but it doesn't need it.

That's it! Hope you enjoy, and as always, feedback is appreciated!

Until next time!


Ingredients


  • 1 low-calorie wrap (I used a Fiber One 80-calorie white wrap)
  • 2 tbsp low-fat mayonnaise 
  • 1/2 cup lettuce (I used romaine)
  • 6 cherry tomatoes, sliced thin
  • 1/4 sweet onion, sliced thin
  • 3 slices center cut bacon (I used Oscar Mayer)
  • 1 5-oz boneless, skinless chicken breast, cooked 
  • Salt and pepper, to taste


Serving size: entire recipe
Weight Watchers PointsPlus value: 8


Instructions


  1. If you'll be using a foreman to cook this, preheat it to 375.
  2. Lay the wrap on a plate and spread the mayo across it. Arrange the lettuce, tomato, and onion across half of the wrap. 
  3. Cook the bacon in the microwave according to package instructions. Crumble on top of the veggies.
  4. Take the cooked chicken and slice it (I grilled my chicken on the Foreman, but you can cook it on the stove or the grill). Arrange the chicken on top of the bacon. Sprinkle the whole thing with salt and pepper.
  5. Transfer the wrap to the grill (I recommend using a Foreman so you don't need to flip it). Cook for 8-10 minutes. If you're using a pan on the stove, spray the pan with no-calorie cooking spray and flip continuously until the wrap is equally browned on each side.
  6. Transfer to a plate. Let cool for a few minutes, then enjoy!


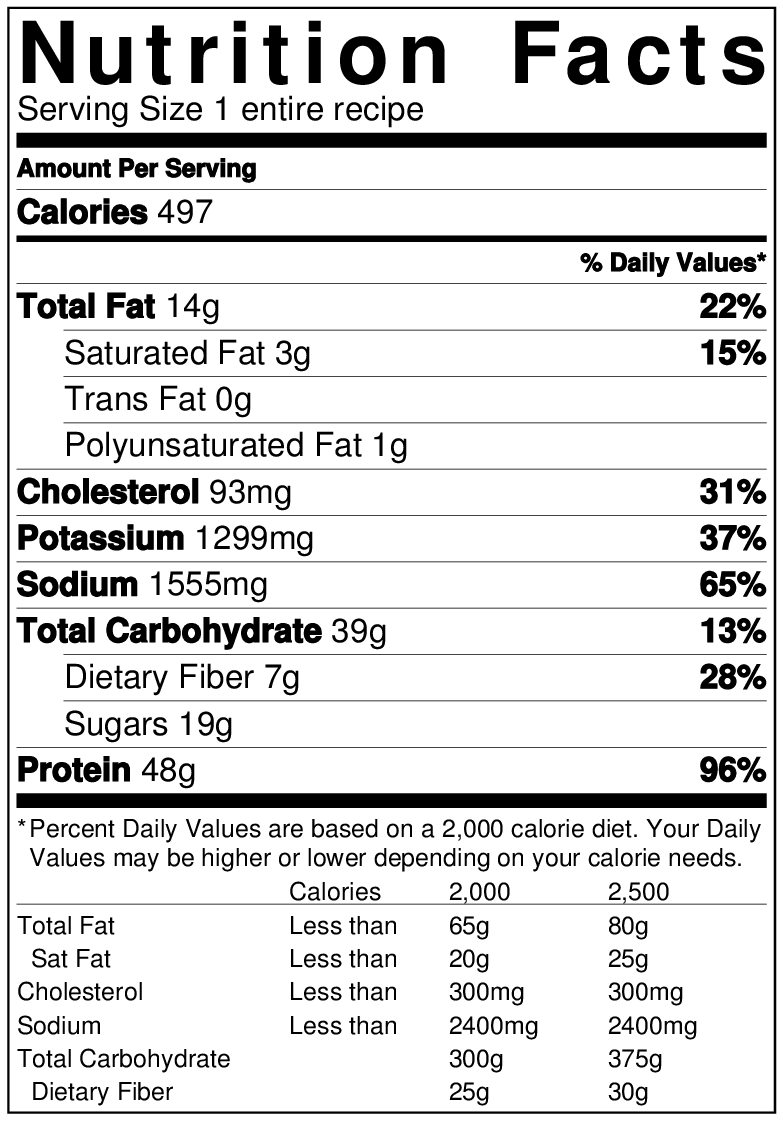
Nutritional Information

Sunday, April 19, 2015

Lightened-Up Carbonara Pasta

This dish right here is the definition of a happy accident. I hadn't gone food shopping this week and worked late a few nights and needed to make something quick. I boiled some pasta and was rummaging through my fridge to see what I could add to it. I had some bacon, an onion, and a pepper. I found some peas in the freezer, added a makeshift cheese "sauce," and was pleasantly surprised with the outcome.


It wasn't until later that I realized it resembled a carbonara. I knew I needed to add it to the blog.

It's really quite easy to make. Start by chopping and cooking your veggies.


While they're cooking, prepare the pasta. Add the cheese wedges and mix - this will serve as your "sauce."


Now, I'm not a professionally trained chef (shocking, I know). I make meals that are easy, tasty, and diet-friendly. Maybe one day I'll learn how to cook a real, professional sauce but until then, these The Laughing Cow cheese wedges work just fine.

When the veggies are done, add them to the pasta and stir to combine.


If your cheese wedges didn't melt fully before, they'll definitely melt when you add the hot, cooked veggies and stir. 

Next up, BACON. I never liked bacon as a kid, but as an adult I've developed a taste for it. I'm late to the game, I know. But the point is, I like it now and I use it in lots of recipes and it really just takes them from good to great. For this recipe, cook the bacon, then crumble it over the pasta and stir to combine.


Finally, add the grated cheese, season with salt and pepper, and BOOM. Lightened-up carbonara pasta. 

I made this tonight (Sunday) and plan on bringing it to work for lunch this week. It can be microwaved and eaten hot, or eaten cold as a pasta salad - it's great both ways.

As always, feedback is appreciated!

Until next time!

Ingredients

  • 12 oz (1 box) shell pasta, cooked according to package instructions
  • 1 medium green bell pepper, finely chopped
  • 1 medium onion, finely chopped
  • 1 cup frozen peas
  • 5 wedges The Laughing Cow Light Creamy Swiss cheese
  • 10 slices Oscar Mayer center cut bacon (or brand of your choice)
  • 1/4 cup grated parmesan cheese
  • Salt and pepper (to taste)


Serving size: 1/5 of recipe
Weight Watchers PointsPlus value: 9

Instructions

  1. Spray a large frying pan or skillet with no-calorie nonstick cooking spray. Place it on the stove on medium/high heat and add the green pepper, onion, and peas. Stirring occasionally, cook until the veggies are soft and slightly brown, about 10-12 minutes. (Note: It saves time if you cook the pasta while the veggies are cooking).
  2. When the pasta is cooked, drain it and then transfer to a large bowl.
  3. While the pasta is still hot, add the cheese wedges to the bowl and stir immediately to melt and combine. If the cheese doesn’t melt fully, don’t worry – you’ll stir again after you add the cooked veggies.
  4. When the vegetables are done cooking, add them to the pasta and stir to combine.
  5. Cook the bacon according to package instructions (I always microwave mine, it’s fastest and easiest). Crumble the bacon over the pasta and then stir to combine (I usually just wait until the bacon cools off and then break it into pieces with my fingers).
  6. Add the grated cheese and stir to combine. Season with salt and pepper, give it one final stir, and serve!


Nutritional Information