Showing posts with label quick recipe. Show all posts

Sunday, November 1, 2015

BOO! Brownies

Hello everyone! I know, I know, I haven't been keeping up on my vow to try to post one new recipe a week. I'm sorry! My job has been absolutely crazy and the weekends fill up so fast, especially as the holiday season approaches! (I can't believe I just typed that ... I'm SO not ready for the holiday season yet!) BUT, I'm hoping you forgive me because these brownies are about to rock your world.


These brownies are everything brownies should be. Chocolatey. Chewy. Ooey gooey. Fudgy. Stuffed with leftover chopped up Halloween candy. And an added bonus? They're low calorie.

To eliminate a bunch of the calories and fat associated with brownies, simply swap out the oil and eggs the recipe calls for and use a can of pumpkin instead (pumpkin puree - NOT pumpkin pie filling). If you're not a fan of the pumpkin flavor, don't fear: you can barely taste it once the brownies are baked. Honestly, if you didn't know there was pumpkin puree in here you'd never guess it. The consistency is fudgy and the brownies are delicious.


Then, because it was Halloween and because I grossly overestimated the amount of candy we'd need for trick-or-treaters, I took these brownies to the next level by mixing in chopped up Halloween candy. I used my favorites (and the nutritional stats provided are for the candy I used) but you can use whatever you want.


Pop 'em in the oven and you're good to go!


I promise you, it doesn't get much easier than this!

Until next time!

Ingredients

  • 1 box of brownie mix (I used Betty Crocker Fudge Brownies)
  • 1 15-oz can Libby's 100% Pure Pumpkin (NOT pumpkin pie filling)
  • Leftover Halloween candy (I used three snack size Kit Kat, three fun size Milky Way, and three bite size 3 Musketeers bars)

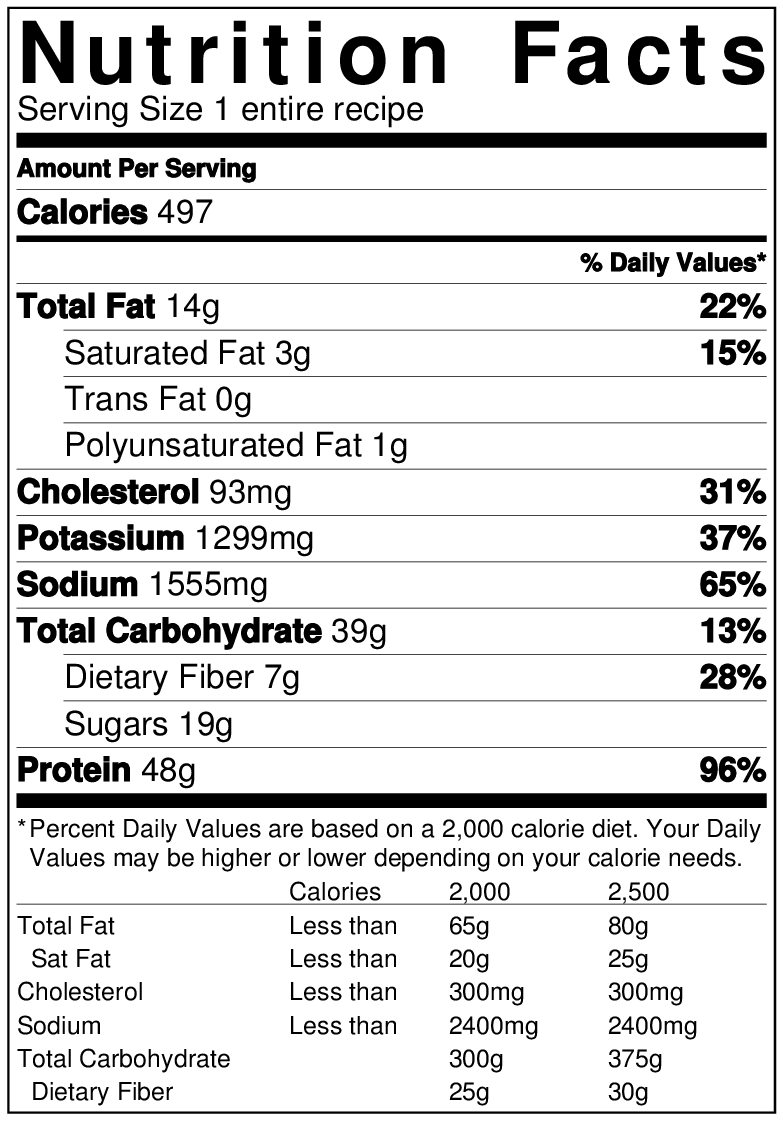
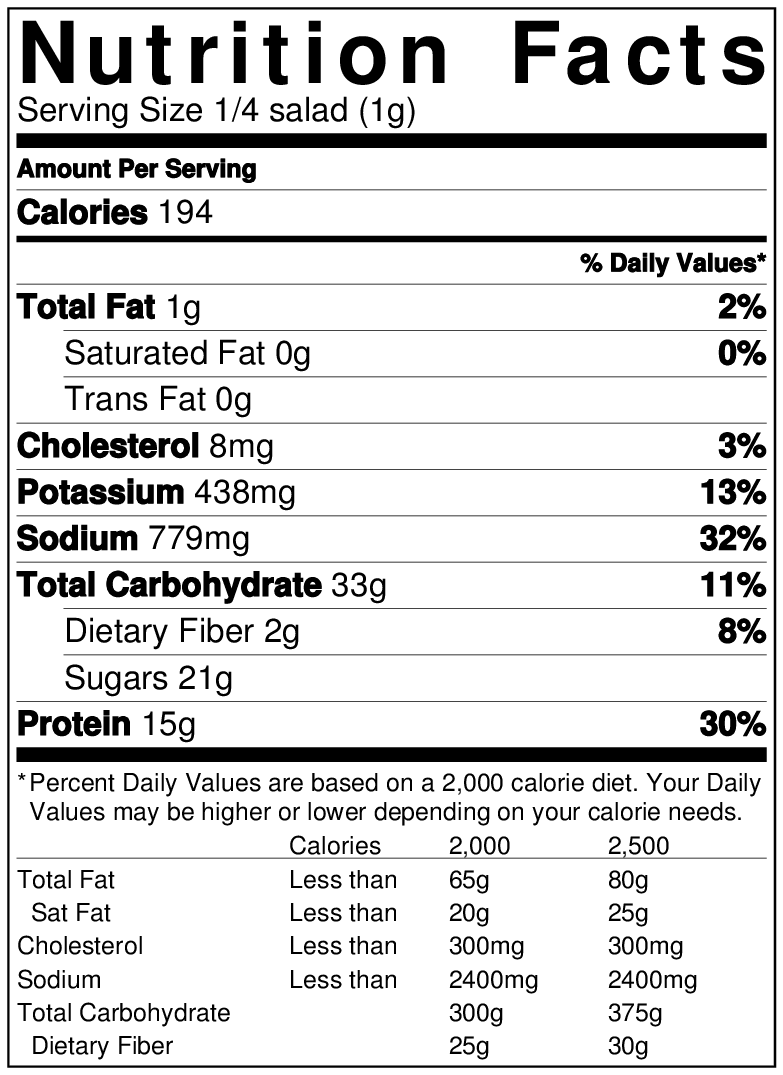
Serving size: 1/12 of recipe or 1/16 of recipe, depending on how big you cut the brownies
Weight Watchers PointsPlus value: 6 (if making 12 brownies) or 4 (if making 16 brownies)

Instructions

  1. Preheat the oven to 350 degrees. Spray a 9 x 13 pan with cooking spray and set aside.
  2. In a large mixing bowl, combine the brownie mix and canned pumpkin. Set aside.
  3. Chop your chosen candy into small chunks. Add to the brownie mix and stir to combine.
  4. Pour the mix into the pan. Spread evenly. Bake at 350 degrees for 24-26 minutes or until a toothpick inserted into the center of the pan comes out clean.
  5. Let cool slightly, then cut into squares and enjoy!


Saturday, July 4, 2015

Lightened-Up Texas Toast

Happy Independence Day, everyone! Sorry for the long hiatus between my last post and this one - work has been busy, and I've taken on some freelance work as well, so things have been a bit crazy. I hope everyone has something fun planned for the holiday today! Me? I'll be relaxing at my in-laws' house, spending time with good people and eating good BBQ'd food (today will probably NOT be a diet-friendly day, but what can you do).

Anyway, I wanted to share this SUPER SIMPLE recipe for Texas toast with you! I was trying to think of a clever line about Texas being American and that's why I decided to wait until July 4th to share this recipe, but the truth is, this recipe has nothing to do with Independence Day. It's just really easy and delicious and you should make it ASAP.


My husband found Texas toast in the supermarket a few years ago. It's basically thick garlic bread, toasted, and covered in melted cheese. It's amazing, but definitely not amazing for someone who is trying to count calories. So a few weeks ago, I was having grilled chicken for dinner, and I wanted something on the side. My husband, who for some reason (like most men I know) doesn't have to worry about his weight, was making the store-brand Texas toast with his dinner, and it looked REALLY good. So I opened my fridge and saw that I had some English muffins, and I decided to see what I could do.

I toasted an English muffin, then covered each part with I Can't Believe It's Not Butter spray. Zero-calorie butter spray can be your best friend in recipes. Personally, I don't think it's tasty enough on its own to have with nothing else (I'd never eat toast with butter spray and nothing else) but it's good when paired with something else. For example, toast with butter spray and jelly, toast with butter spray and cinnamon sugar, etc. And in this recipe, it works perfectly.


Next, I sprinkled (pretty generously) garlic powder on top of the spray. Then I took some part-skim mozzarella and spread it across the top of the garlic. Pop it in the oven at 375 for about 5 minutes until the cheese melts, and there you have it - easy, delicious, lightened-up Texas toast.


I made my husband try it - he approves! He'll probably continue to eat the "good stuff" from the supermarket because he can, but I'm happy he approves of my lighter version too.

That's it! Make this the next time you have chicken or pasta and let me know what you think!

Until next time!


Ingredients


  • 2 Fiber One English muffins
  • I Can't Believe It's Not Butter Spray (roughly 32 sprays)
  • Garlic powder (to taste)
  • 2 oz part-skim mozzarella cheese


Serving size: 2 pieces (half of recipe)
Weight Watchers PointsPlus value: 5


Instructions


  1. Preheat the oven to 375 degrees.
  2. Toast each English muffin to desired crispiness.
  3. Spray each muffin half with butter spray. The recipe calls for ~32 sprays, or 8 per piece of toast, because I like mine extra buttery. Feel free to use more or less as desired. Sprinkle garlic powder over the top of each piece.
  4. Distribute the cheese evenly among the pieces of toast. I've been using the mozzarella blocks lately, so I measure out 2 oz on my food scale and then slice it into small pieces and distribute them among the pieces. If you use shredded cheese, this will probably be easier to measure. Either way, each piece of toast gets about half an ounce of cheese.
  5. Put the toast on a baking sheet and pop it in the oven for 5 minutes, or until the cheese looks melted but not burnt. (TIP: I like to put a piece of tin foil on my baking sheet to eliminate mess).
  6. Let cool slightly, and enjoy!


Nutritional Information


Saturday, June 20, 2015

Skinny Chicken BLT Quesadilla

I used to be a weird person who didn't like bacon. I'm still kind of picky about it - I don't like when it's too crispy and I'd rather eat it as a part of a sandwich or inside a recipe than on its own, but I've finally come to love bacon and the flavor it brings to so many dishes.

And I absolutely love a good BLT.


For those of you who don't know, BLT stands for bacon, lettuce, tomato (just covering my grounds here)! It's usually served on a roll or wrap with a ton of mayo and it's delicious. Not the healthiest option, though.

Until now.

By using low-fat mayo, center-cut bacon, and a toasted low-cal wrap, you can eliminate a lot of the fat and calories associated with a traditional BLT. And it tastes just as good, promise! I even added some grilled chicken for extra protein and to bulk this up so it can be eaten for dinner as a meal.

Start by spreading the mayo across the wrap. Layer the lettuce, tomato, and onion across one half of the wrap. 


Next, add the bacon. I cook mine in the microwave. It's easy, fast, and eliminates splatter (nothing worse than being burnt by bacon grease while cooking on the stove). Just put a paper towel on a microwave-safe dish, place your bacon on the paper towel, and place another paper towel on top. Microwave for 60-90 seconds (depending on how crispy you like it) and then crumble it over the wrap.


Next, add the chicken. I seasoned mine with salt,.pepper, and garlic and cooked it on the Foreman grill (8-10 minutes on 375 degrees) but you could also cook it on the stove or grill it - whichever you prefer. Slice the chicken and spread it across the wrap. Sprinkle with salt and pepper.


Now, the hard part - transferring the wrap to the grill. I really recommend using a Foreman is you have one - this way both sides will be grilled at the same time. You can grill the wrap on the stove, but you'll have to keep flipping it and it might be hard to keep everything inside of it. Once it's safely on the grill, fold the half not covered in filling over the other half and let it grill!


I kept my grill on 375 and let it go for about 8 minutes. 


This definitely needs to be eaten with a knife and fork. Anything else would be way too messy! I had mine with a little fat free ranch dressing on the side for dipping, but it doesn't need it.

That's it! Hope you enjoy, and as always, feedback is appreciated!

Until next time!


Ingredients


  • 1 low-calorie wrap (I used a Fiber One 80-calorie white wrap)
  • 2 tbsp low-fat mayonnaise 
  • 1/2 cup lettuce (I used romaine)
  • 6 cherry tomatoes, sliced thin
  • 1/4 sweet onion, sliced thin
  • 3 slices center cut bacon (I used Oscar Mayer)
  • 1 5-oz boneless, skinless chicken breast, cooked 
  • Salt and pepper, to taste


Serving size: entire recipe
Weight Watchers PointsPlus value: 8


Instructions


  1. If you'll be using a foreman to cook this, preheat it to 375.
  2. Lay the wrap on a plate and spread the mayo across it. Arrange the lettuce, tomato, and onion across half of the wrap. 
  3. Cook the bacon in the microwave according to package instructions. Crumble on top of the veggies.
  4. Take the cooked chicken and slice it (I grilled my chicken on the Foreman, but you can cook it on the stove or the grill). Arrange the chicken on top of the bacon. Sprinkle the whole thing with salt and pepper.
  5. Transfer the wrap to the grill (I recommend using a Foreman so you don't need to flip it). Cook for 8-10 minutes. If you're using a pan on the stove, spray the pan with no-calorie cooking spray and flip continuously until the wrap is equally browned on each side.
  6. Transfer to a plate. Let cool for a few minutes, then enjoy!


Nutritional Information


Thursday, June 11, 2015

Watermelon Feta Salad with Balsamic Glaze

I think I've found my go-to summer salad.


It's crisp and fresh and the ingredients work together in such an amazing way. It's also really easy and can be thrown together really quickly if you need something to serve for company or to bring to a BBQ.

I heard someone mention a watermelon feta salad last summer, and even though I was curious, I never actually made or tried the combination. Recently, I decided I needed to start doing something new for lunch - my daily lunches at the office were getting STALE - and since it finally feels like summer - and what says "summer" more than juicy watermelon? - I decided to revisit the watermelon feta combo. 

I looked online for inspiration and then created this salad with my own twist. Some people make their watermelon feta with oil. Some use oil and vinegar. Some use balsamic. Some added other ingredients; others kept it simple.

You start with your greens.


I've made this salad three times this week (when I fall in love with a new food or meal, I eat it almost exclusively and obsessively until I move on to the next thing. I have a problem). The first two times, I used baby arugula. Pictured in this recipe is baby spinach, since I ran out of arugula. Both combinations work, but I think if I had to choose I'd choose the arugula.

Then it's just three additional ingredients (watermelon, red onion, and feta cheese) before the dressing, and you're done. Simple!


Next comes the dressing. I went back and forth a few times with this. I didn't think I'd like the oil or oil/vinegar combo with the watermelon. Balsamic vinegar is always a good choice, but I felt like this salad needed something sweeter. That's why the balsamic glaze is perfect. It has the flavor of balsamic but it's much thicker and sweeter than the vinegar. It goes perfectly with this salad.


I wish I could explain why all these ingredients work together so well. I wish I could tell you why the sweetness of the watermelon tastes so good with the crunchy red onion. I wish I could explain how the feta adds a subtle but amazing flavor to the salad and how the balsamic glaze ties it all together in the most delicious way. I wish I could tell you why, but I can't. I don't know why all these ingredients work together. They just do. And you need to try it ASAP.

Summer is coming - and it deserves to be celebrated with this salad.

Until next time!


Ingredients


  • 12 cups baby arugula (2 bags of salad mix)
  • 4 cups watermelon, cubed
  • 6-8 oz fat free feta cheese, crumbled
  • 3/4 cup red onion, finely chopped
  • 6 tbsp balsamic glaze


Serving size: 1/4 salad
Serves: 4
Weight Watchers PointsPlus value: 5


Instructions


  1. Rinse the arugula and place it in a large bowl. Add the watermelon, feta cheese, and red onion, and toss to combine.
  2. Drizzle the balsamic glaze over the salad. Toss again to combine. Let sit for 15 minutes before serving, or refrigerate overnight and serve the following day.


Nutritional information


Tuesday, June 2, 2015

BBQ Shrimp Tacos with Avocado Ranch Coleslaw

As soon as I posted this coleslaw recipe over the weekend, I started thinking about how yummy it would be on a shrimp taco. So as promised (okay, not "promised" - I just hinted at it), here's a shrimp taco recipe. With the avocado coleslaw. A perfect combination.


This recipe also screams "summer" to me. I made it for lunch on Sunday after my husband and I spent the day outside doing yardwork and assembling our new backyard swing. It was really hot on Sunday and the cool, crispy avocado paired with the sweet BBQ shrimp made for a refreshing lunch. 

By the way, this recipe got the "husband-approved" stamp, which I'm happy about. He's a somewhat picky eater (not too bad) and sometimes I just cook for me and he cooks for him. But he ate these and he liked them, which makes me more excited to post them.

When I cook with shrimp, I like to use cooked frozen shrimp. They're simple to defrost - just let them sit in a bowl of hot water for a few minutes.


Once the shrimp are defrosted (or mostly defrosted), it's time to cook them. I used the Foreman to cook mine, but these can definitely be cooked on a grill as well. We haven't used our grill yet this season, so onto the Foreman they went.


They only need to be on the Foreman for about 3 minutes. Technically, once they're defrosted they're good to eat, but for this recipe grilled/warm shrimp works better. If you're cooking on an outdoor grill, you may want to leave them on a little longer, and then just remove them when they're grilled to your liking.

Once the shrimp are done, put them into a bowl and toss with the BBQ sauce.


While you're doing this, you can warm your tortillas. This isn't necessary, but if you're like me (in the sense that you think a warm wrap is ALWAYS better than a cold one), throw your tortillas on the grill for 30 seconds to a minute to warm them up.


Then, assemble the tacos. Layer slaw, three shrimp, and a sprinkle of ground cayenne. That's it!


Of course, this recipe does require a little advanced prep - you'll need to make the coleslaw as well. But that's super easy too and the whole thing (coleslaw and tacos) can easily be done in less than 30 minutes.

As always, I'd love to know if you have questions, comments, or feedback! Enjoy!

Until next time!

Ingredients

  • 9 medium-large frozen cooked shrimp
  • 2 tbsp BBQ sauce (I prefer Honey BBQ)
  • 3 extra thin corn tortillas
  • 1 serving Avocado Ranch Coleslaw (prepare in advance)
  • Pinch of ground cayenne pepper


Serving size: 3 tacos (entire recipe)
Weight Watchers PointsPlus value: 9

Instructions

  1. Defrost the shrimp by placing them in a bowl or hot water. Once the shrimp are soft enough, remove the tails.
  2. Place the shrimp on the Foreman or grill. Cook for approximately 3 minutes, or until grilled to your preference.
  3. Transfer the cooked shrimp to a bowl. Add the BBQ sauce and toss until the shrimp are fully coated. If you prefer, warm the tortillas on the grill while you're tossing the shrimp with sauce.
  4. Distribute the slaw evenly among the tortillas. Add three shrimp to each taco, then sprinkle with ground cayenne. 


Nutritional Information


Saturday, May 30, 2015

Avocado Ranch Coleslaw

Well HELLO! I apologize for getting a little off-track with my posts the last couple of weeks. Work was really busy and then I was thrown off by the holiday weekend. I hope everyone who had a three-day weekend enjoyed it! My parents have a house in upstate New York and every Memorial Day my dad's side of the family heads up there. There are tents and bonfires and games and music and singing and hanging out by the pool ... oh, and there's a TON of eating. And drinking. Let's just say Memorial Day weekend is NOT a Weight Watchers weekend. Oh well ... worth it.

But, the holiday is over and I need some healthy food back in my life. Enter this week's recipe: Avocado Ranch Coleslaw! 


I absolutely love coleslaw. But prepared the traditional way, with a ton of mayo, it's definitely not healthy. Another thing I absolutely love is avocado. Especially in summer. Something about fresh avocado (and homemade guacamole) just resembles summer to me. I came up with the idea to combine the two, and it worked out pretty nicely. The addition of ranch is just because I think ranch dressing makes everything better. Wings, veggies - what doesn't benefit from a little ranch?

Anyway, let's discuss this recipe. It's really easy and tasty too. And I'm already thinking of ways it can be used other than just as a side dish (hint: I think it would be REALLY yummy on shrimp tacos. There may or may not be a recipe coming soon that uses this coleslaw that way ...)

Start with a package of coleslaw in a large bowl. I usually buy Dole Classic Coleslaw when I make slaw, but any brand will do.


Then, in a small bowl, combine everything else (avocado, ranch, sour cream, mayo, and vinegar). The avocado I used was perfectly ripe, so I only needed to use a spoon to combine everything. If your avocado is still a little hard, you may need to use a hand mixer. I think that avocados taste the best when they're slightly mushy to touch but still firm overall. They're also much easier to mix when they're like this.


Add the avocado mix to the slaw and stir, stir, stir until the slaw is coated evenly. Season generously with salt, pepper, and garlic powder and stir again.


Cover and refrigerate until ready to serve. It tastes best if you're able to refrigerate for at least an hour. Since this uses avocado, it may start to brown after a day or so, so I recommend making this when you know you'll be eating it or serving it within a day.

Before serving, sprinkle with salt, pepper, and garlic powder again and give it a final stir to combine.

That's it! It's good on the side of a summer meal, but I personally think it would be even better when incorporated into a meal, like on a burger or sandwich, or inside some shrimp tacos ... (hint, hint)!

Enjoy! As always, feedback is appreciated!

Until next time!


Ingredients


  • 1 bag coleslaw mix 
  • 1 medium avocado (about 7 oz), shelled and pit discarded
  • 3 tbsp fat free ranch dressing
  • 1 tbsp fat free sour cream
  • 1 tbsp low fat mayonnaise
  • 1/2 tsp white vinegar
  • Salt, pepper, and garlic powder (to taste, but I recommend being generous with these)


Serving size: 1/4 of recipe
Weight Watchers PointsPlus value: 3


Instructions


  1. Empty the coleslaw mix into a large bowl. Set aside.
  2. In a small bowl, combine the avocado, ranch, sour cream, mayo, and vinegar. Depending on how soft your avocado is, you may need a hand mixer for this.
  3. Add the avocado mix to the slaw and stir until the slaw is evenly coated. Season generously with salt, pepper, and garlic powder, and stir to combine.
  4. Cover and refrigerate until ready to serve (I recommend refrigerating for at least an hour, and serving within a day).
  5. Before serving, season again with salt, pepper, and garlic powder and give the slaw a final stir.


Nutritional Information


Tuesday, May 19, 2015

Four-Ingredient No-Bake Oreo Cream Pie

In my opinion, the Oreo is the best packaged cookie in existence. Which makes this simple, no-bake pie a pretty awesome dessert to make for summer.


It's starting to get really warm out, and I don't know about you, but I absolutely hate having my oven on when it's hot outside. I like to keep my house cool as a break from the heat. Unfortunately, some of the best desserts are made in the oven (see: chocolate chip cookies, brownies, cupcakes, cake ... you get the idea).

But this? This pie is delicious and requires ABSOLUTELY NO BAKING. And it literally takes less than 5 minutes to make. It's perfect for when you want to make a delicious and impressive dessert but you don't have time (and don't want to put in a ton of effort).

Oh, and did I mention it's only four ingredients? (Just kidding, I know I did because it's in the recipe title, but I wanted to mention it again because it's a big selling point).

Pre-baked pie crust is one of the best inventions.


At my local Stop & Shop, they have regular graham cracker pie crusts, chocolate graham cracker pie crusts, and chocolate cookie pie crusts. Some stores have Oreo brand crusts, but mine didn't. No worries though - the chocolate cookie crust tastes exactly like an Oreo (and I saved money by buying store brand)!

In a medium bowl, combine Jell-O Oreo pudding mix with an entire 8-oz tub of Cool Whip Free. (Side note: Cool Whip Free + any flavor of pudding mix = DELICIOUS. I like the taste better than pudding prepared the traditional way, and it's MUCH quicker.If you wanted to, though, you could prepare the pudding with milk, let it set, and use that instead).


The inspiration for this recipe actually came from this pudding mix. I was shopping for pudding mix for last week's recipe and I saw this, and I immediately started brainstorming dessert ideas I could use it in. 

Once the pudding mix and the Cool Whip are combined, crumble four of the Oreo cookies into the bowl and mix.


Spread the mix into the pie crust, and then crumble the remaining three Oreos on top.


BAM. That's it. You're done. Eat it immediately, if you want to. You can refrigerate it, but it doesn't need it.

I made this last night and served it for two of my friends during our "The Bachelorette" premiere night. Yes, I love "The Bachelorette." Yes, I have my friends over for sushi, wine, and dessert when the new seasons start. Yes, it's amazing.

Anyway, I let them know that they were taste testing for the blog, and the reviews were positive so I figured I'd post it today in advance of Memorial Day weekend! If you need to bring a dessert to a BBQ, this could be it.

I hope you enjoy it! I'd love feedback if you make it. 

Until next time!

Ingredients

  • 1 Oreo cookie pie crust
  • 1 box Jell-O Oreo cookies and cream pudding mix
  • 8 oz Cool Whip Free (one tub)
  • 7 reduced fat Oreo cookies

Serving size: 1/8 of pie
Weight Watchers PointsPlus value: 7

Instructions

  1. In a medium bowl, combine the Jell-O mix and the Cool Whip Free. Crumble four of the Oreo cookies into the bowl and mix to combine.
  2. Spread the pudding mixture into the pie crust.
  3. Crumble the remaining three Oreos over the top of the pie.


Nutritional Information