Monday, November 16, 2015

Pumpkin S'mores Puffs

Hello there! I hope everyone has been enjoying fall! It's been unseasonably warm over here, and I've been pretty busy as well! Every year I say I'm going to start my Christmas shopping before Thanksgiving ... and this year I actually did it! Plus, my weekends have been filled with friends and family and car shopping - all fun things, but they've been preventing me from being able to post here as often as I'd like.

So let's take a minute and celebrate fall with these Pumpkin S'mores Puffs.


I used Pillsbury Reduced Fat Crescent Rolls to make these. I love the crescent rolls, because depending on what you stuff them with, they can be a delicious appetizer, dinner, or dessert. These S'mores Puffs make an excellent fall dessert, or could even be served at brunch.

For this recipe, I stuffed them with pureed pumpkin, cream cheese, cinnamon, chocolate chips, and marshmallows. 


Topping the crescents off with graham cracker crumbs before you bake them to gooey perfection really gives them the S'mores feel.


Once they're done, let them cool - just slightly though - these are definitely most delicious when served warm. If you're preparing them in advance, you can refrigerate them until ready to serve - just pop them in the oven or toaster oven for a few minutes (or the microwave for 15-20 seconds) before serving to make sure the center gets all warm and gooey.


Enjoy!

Ingredients

  • 1 package Pillsbury Reduced Fat Crescent rolls
  • 1/3 cup Libby's 100% Pure Pumpkin (NOT pumpkin pie filling)
  • 2 tbsp fat free cream cheese (softened)
  • 1 packet Sweet'N Low (or no-calorie sweetener of your choice)
  • 1 tsp ground cinnamon
  • 2 tbsp chocolate chips (I used Nestle semi-sweet minis)
  • 1/3 cup mini marshmallows
  • 2 tbsp graham cracker crumbs

Serving size: 1 puff (recipe yields 8)
Weight Watchers PointsPlus value: 4

Instructions

  1. Preheat oven to 375 degrees. Lightly spray a baking sheet with no-calorie spray.
  2. Unroll the crescent dough and separate the triangles. Lay them on the baking sheet.
  3. In a small bowl, combine the pumpkin, cream cheese, sweetener, cinnamon, and chocolate chips. Distribute evenly among the 8 crescent rolls - be sure to spoon the mixture onto the center of the rolls, as this will make folding them easier.
  4. Top the mixture with mini marshmallows (there should be enough to place about 3-5 in each crescent). Once this is done, fold the dough over so that the mixture is sealed inside. If necessary, pinch the dough together lightly at the seams.
  5. Spray the tops of the rolls lightly with no-calorie cooking spray (this will help the graham cracker crumbs stick). Sprinkle the crumbs over the tops of the crescent rolls.
  6. Bake for 9-12 minutes - you'll know they're done when the tops are golden brown. Remove from the oven and let cool for 5 minutes before serving.

Sunday, November 1, 2015

BOO! Brownies

Hello everyone! I know, I know, I haven't been keeping up on my vow to try to post one new recipe a week. I'm sorry! My job has been absolutely crazy and the weekends fill up so fast, especially as the holiday season approaches! (I can't believe I just typed that ... I'm SO not ready for the holiday season yet!) BUT, I'm hoping you forgive me because these brownies are about to rock your world.


These brownies are everything brownies should be. Chocolatey. Chewy. Ooey gooey. Fudgy. Stuffed with leftover chopped up Halloween candy. And an added bonus? They're low calorie.

To eliminate a bunch of the calories and fat associated with brownies, simply swap out the oil and eggs the recipe calls for and use a can of pumpkin instead (pumpkin puree - NOT pumpkin pie filling). If you're not a fan of the pumpkin flavor, don't fear: you can barely taste it once the brownies are baked. Honestly, if you didn't know there was pumpkin puree in here you'd never guess it. The consistency is fudgy and the brownies are delicious.


Then, because it was Halloween and because I grossly overestimated the amount of candy we'd need for trick-or-treaters, I took these brownies to the next level by mixing in chopped up Halloween candy. I used my favorites (and the nutritional stats provided are for the candy I used) but you can use whatever you want.


Pop 'em in the oven and you're good to go!


I promise you, it doesn't get much easier than this!

Until next time!

Ingredients

  • 1 box of brownie mix (I used Betty Crocker Fudge Brownies)
  • 1 15-oz can Libby's 100% Pure Pumpkin (NOT pumpkin pie filling)
  • Leftover Halloween candy (I used three snack size Kit Kat, three fun size Milky Way, and three bite size 3 Musketeers bars)

Serving size: 1/12 of recipe or 1/16 of recipe, depending on how big you cut the brownies
Weight Watchers PointsPlus value: 6 (if making 12 brownies) or 4 (if making 16 brownies)

Instructions

  1. Preheat the oven to 350 degrees. Spray a 9 x 13 pan with cooking spray and set aside.
  2. In a large mixing bowl, combine the brownie mix and canned pumpkin. Set aside.
  3. Chop your chosen candy into small chunks. Add to the brownie mix and stir to combine.
  4. Pour the mix into the pan. Spread evenly. Bake at 350 degrees for 24-26 minutes or until a toothpick inserted into the center of the pan comes out clean.
  5. Let cool slightly, then cut into squares and enjoy!


Sunday, October 11, 2015

Buffalo Chicken Mac & Cheese

So, I really hope it doesn't bother anyone that the main ingredient in this mac & cheese is, in fact, packaged mac & cheese. I've mentioned before that my goal is for my recipes to be easy, fast, and low-calorie - and I've also mentioned that I'm not a chef - so right now, I'm not in a position to create mac & cheese from scratch. Maybe someday, but for now, packaged mac & cheese it is.

But don't worry, it is GOOD.


I love Pirate's Booty white cheddar popcorn, and when I found out they made mac & cheese I knew I had to try it. The aged white cheddar shells are my favorite, and the white cheddar works really well with the hot sauce in this recipe.


I used poached chicken for this recipe because it's easy to shred. While you're boiling the water for the mac & cheese, put some water in a shallow pan. Season the chicken with salt, pepper, and garlic powder and add it to the pan.


While you're preparing the mac & cheese (according to package instructions), flip the chicken every couple of minutes. Let it boil and cook until it's completely cooked through - you'll know it's done when you cut into the middle and it's not pink.


Once the chicken is cooked, use two forks to shred it, then set it aside. Finish preparing the mac & cheese - once the pasta is cooked, you need to drain it, return it to the pan, and then add the butter, milk, and packaged cheese sauce. Stir to combine, and then add the shredded chicken to the pot and stir.


Add the ranch dressing and hot sauce and stir to combine. If you like things really spicy, add 2 tablespoons of hot sauce. If not, only add one. I've made this twice so far, and my husband and I both prefer it with one tablespoon, not 2.


Finally, add the breadcrumbs. I like to pour half the breadcrumbs (1/8 cup) right into the pot and stir it. Then, I divide the mac & cheese into two bowls and sprinkle the remaining 1/8 cup of breadcrumbs over the top.


And that's it! You're done! Perfect weeknight meal for two (or one, and then you have leftovers for lunch).

Until next time!


Ingredients


  • 1 box Pirate's Booty Shells & Cheese Aged White Cheddar, prepared according to package instructions
  • 1/4 cup milk (for mac & cheese)
  • 1/2 tbsp butter (for mac & cheese)
  • One 4-5 oz chicken breast
  • Salt, pepper, and garlic powder, for seasoning
  • 1 tbsp fat free ranch dressing
  • 1-2 tbsp Frank's Red Hot sauce (depending on how hot you like it)
  • 1/4 cup whole wheat breadcrumbs


Serving size: 1/2 recipe
Weight Watchers PointsPlus value: 12


Instructions


  1. Prepare the mac & cheese according to package instructions. You'll need the milk and butter for this.
  2. While the water is boiling, season the chicken. Add some water (about 1") to a shallow pan and bring to a boil. Place the chicken in the water. Flip every 1-2 minutes until the chicken is cooked completely - you can check this by cutting into the center of the chicken and making sure it's not pink.
  3. Once the chicken is cooked, transfer it to a plate or cutting board. Using two forks, shred the chicken. Add the shredded chicken to the finished mac & cheese and stir to combine.
  4. Add the ranch dressing and hot sauce to the pot and stir to combine.
  5. Add half of the breadcrumbs to the pan and stir. Distribute the mac & cheese into two bowls and sprinkle the remaining breadcrumbs over the top. Enjoy!


Nutrition


Saturday, September 26, 2015

Sweet and Cheesy Jalapeno Chicken Wontons

Sometimes you have an idea for a recipe in your head and it just doesn't work out. In your mind, the ingredients complement each other perfectly, but when you actually create it, the flavors don't mesh and you wind up with a mess on a plate. Sometimes recipe ideas just don't work out.

But sometimes they do.


One of my friends recently had a Tastefully Simple party. Have you ever been to one of those? I love their products (the beer bread is to DIE for). Most of their mixes and dips require just one or two additional ingredients (hence the "simple" in the name). Anyway, when I was flipping through the catalog I came across this Sweet Pepper Jalapeno Jam and had to buy it.


I've had sweet pepper jelly before. It's amazing with crackers and cream cheese. And in wontons.

After I bought the jelly, I was brainstorming ways to use it. I knew I wanted to pair it with cream cheese, but wasn't sure what else. Then it came to me. Chicken. And onions. And wanton wrappers. Boom.

This recipe is only a few ingredients, but it does involve a little more preparation than some of the other recipes I've posted. Not much more, though. It's definitely worth it.

I cook the chicken by poaching it. You need to shred it for this recipe, and I find it's easier to shred when it's poached. I didn't add any spices to the chicken, but you can.


Once it's shredded, add it to a bowl. Combine with the onions, jelly, and cream cheese.


Next comes the moderately time-consuming part: stuffing and sealing the wontons. Start by placing a wonton on a clean, dry surface (like a cutting board). Scoop about a 1/2 tbsp onto the center of the wonton - be careful not to scoop too much, or else it will be really tough to seal the wrapper.

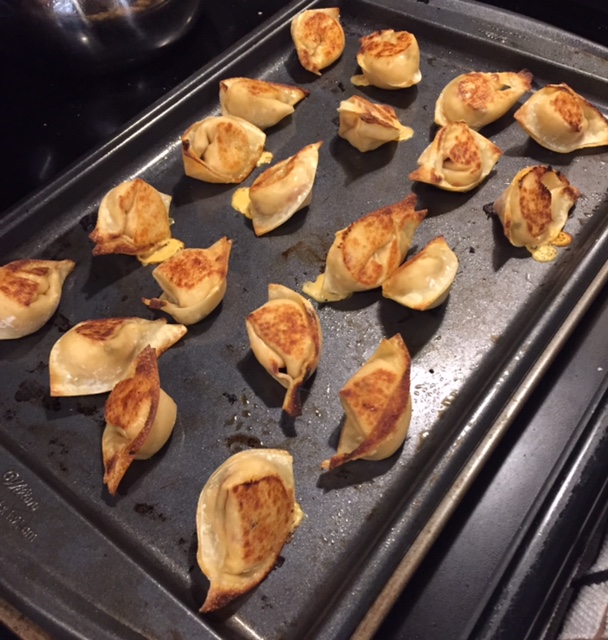
Once the filling is on the wonton, fold it in half so it's triangle-shaped, with the filling sealed inside. Moisten your fingers (it helps to keep a small cup of water next to where you're working) and press down on the edges of the wrapper to seal them. You can cook them like this, or press the two bottom corners together to get that wonton shape (and moisten and press to seal) and cook that way.


Spray a baking sheet with no-calorie nonstick spray. Arrange the wontons on the sheet, spray the tops with nonstick spray, and bake at 400 degrees. After 5 minutes, flip the wontons and bake for another 4 minutes.


Enjoy! Serve warm, either plain or with sweet Asian chili sauce.

Until next time!

Ingredients

  • 1 boneless, skinless chicken breast, cooked and shredded (about 4.5-5 oz)
  • 1/4 cup finely chopped sweet onion
  • 3 tbsp sweet pepper jelly (I use Tastefully Simple, but you can use any brand)
  • 3 tbsp fat free cream cheese
  • 20 wonton wrappers (I use the ones by Nasoya - check the produce or tofu section at the grocery store)

Serving size: 4 wontons
Weight Watchers PointsPlus value: 3

Instructions

  1. Preheat the oven to 400 degrees.
  2. In a small bowl, combine the shredded chicken, onion, jelly, and cream cheese.
  3. Lay a wonton wrapper on a clean, dry surface. Scoop 1/2 tbsp of the chicken mixture onto the center of the wrapper (be sure not to overfill, or else it will be difficult to seal). Fold the wrapper in half to seal the filling inside. 
  4. Moisten the tips of your fingers and press the edges of the wrapper to seal. If you want to, you can then press and seal the two bottom corners together to give it a wonton shape (this isn't necessary, though - you can cook it in the triangle shape, too).
  5. Repeat for the remaining wrappers.
  6. Spray a baking sheet with no-calorie nonstick spray. Arrange the wontons on the baking sheet and spray the tops lightly with nonstick spray.
  7. Bake for 5 minutes, then remove from the oven, flip, and bake for an additional 4 minutes.
  8. Serve warm, either plain or with sweet Asian chili sauce.


Nutrition


Sunday, September 20, 2015

Kitchen Renovation: Part 2 (After)

I'm just going to come out and say it: I've been terrible at blogging lately. I've fallen WAY short of my goal to post at least one new recipe a week. And since we're on the honestly track right now, I have also been pretty terrible at living a Lighter Bites life. In addition to the kitchen renovation, this summer has been filled with plenty of BBQs and outdoor parties, yummy food, lots of drinks, and a bunch of trips and vacations on which I didn't count calories at ALL (we all know that calories don't count on vacation, right?)

But my favorite season - FALL! - is upon us, and I think it's the perfect time to fall back into a routine of exercising, eating healthy, and trying to meet my goal of creating and posting at least one new recipe a week. 

This post won't include a recipe, but I'm finally posting the AFTER photos of our kitchen renovation! My husband and I are absolutely thrilled with how it came out, and we hope you all like it too! In case you forgot what it used to look like, you can revisit the before pictures here.

The wall between the dining room and kitchen used to be fully closed, with just a doorway between. We opened it all up and look how much bigger it looks!


Open concept? Yes please!
The fridge used to be where the stove is now. Originally when the contractor suggested moving it here, I was dead against it. Well, I can admit I was wrong. It looks awesome, and the room feels so much bigger.

Our stove and microwave used to be on the end here, right next to the back door. And the dishwasher was right next to the sink, so you weren't able to open it if you were standing by the sink. The stove was moved to the other side of the counter (and the microwave was raised, because it was really low) and the dishwasher was shifted so we can open it now if we're washing dishes at the sink.


Look how much bigger everything looks!!!

I've got a little coffee nook now!
As you know, we renovated on a budget. We didn't replace any of the appliances, and we kept the floor. Lucky for us, the floor is in good condition and it's really neutral, so we weren't limited with our options. And I happen to really like the black appliances ... not saying we'll NEVER upgrade, but it won't be for a long, long time. 


And I had to get a close-up of the backsplash. How incredible is this beige subway tile?! I'm obsessed with it. It took a while to find it, but I absolutely love it.


Penny still gets her collar/leash caddy!

 Is it normal to be obsessed with a sink? Because I'm obsessed with this sink. 
 Better view of the new HUGE pantry and fridge area.


So open!

Love this little corner nook!
So there you have it! Our beautiful new kitchen! Can't wait to cook up some new recipes to share with you guys!

Until next time!