Monday, March 30, 2015

Honey Teriyaki Chicken Wrap

If you're like me, you don't want to spend a long time in the kitchen after work preparing dinner. I've mentioned that I commute from Long Island to the city for work, so most nights I don't get home until around 7:00. But even if I got home earlier, I wouldn't want to spend too much time getting dinner ready.

That's why this wrap is perfect. It's tasty, fresh, and takes only minutes to prepare. You could cut the prep time down even more if you cook your chicken in advance.


I mentioned earlier that you can save time by cooking chicken in advance. Now, I'm not a chicken expert - I don't want to say with certainty how long cooked chicken will last in a refrigerator before it goes bad. But I've grilled a bunch of chicken breasts on a Sunday, packed them into an airtight Ziploc®, and refrigerated them, and they were fine for about a week. At the very least, you should be able to eat the chicken for up to a few days after you cook it, as long as it's refrigerated and sealed.

There are plenty of ways to cook chicken. You can use the stove, poach it (when I poach I season with salt, pepper, and garlic, but don't add anything else), cook it in the oven (I'd use no-calorie nonstick spray instead of butter or olive oil), use a crock pot, or use my method of choice - grill it on the George Foreman. I season my chicken with salt, pepper, and garlic powder and then just throw it on the Foreman at 400 degrees for 12-14 minutes. 


While the chicken is cooking, add your lettuce, grated cheese, teriyaki sauce, and croutons to a bowl.


The recipe calls for 3 1/2 tbsp of marinade. It doesn't seem like a lot, but trust me, it's more than enough. I used to be guilty of using way more dressing or sauce than necessary because I never believed the small portions would be enough, but once I started measuring more carefully, I realized that a little does go a long way.

When the chicken is finished, cut it into bite-sized pieces and add to the bowl.


Toss the chicken with the rest of the ingredients. Lay the wrap on a plate and place the chicken teriyaki mixture on top of it. 

I like to put my wrap on the Foreman for a few minutes because I think it's better warm - that's just my preference, though. Definitely not a requirement.


The final step is to roll it up as tightly as you can, and enjoy! Also, in doing this, I've added a new goal to my cooking goals: learn how to roll a wrap properly. I'm pretty bad at it.


Make sure you have a fork handy in case you're bad at rolling wraps like I am - it comes in handy to eat the filling that falls out.

So that's that! This is one of my favorites. I've been making this a lot lately. I hope you enjoy it as much as I do!

Until next time!

Ingredients

  • One 4.8-oz chicken breast fillet, cooked (I like Perdue® Perfect Portions® boneless, skinless chicken breasts)
  • 1 cup chopped lettuce (or salad mix of your choice, I like to use Dole)
  • 2 tbsp grated cheese
  • 3 1/2 tbsp honey teriyaki marinade (I use Ken's)
  • 6-9 croutons (I absolutely love the Butter & Garlic ones by Fresh Gourmet)
  • 1 wrap of your choice (100 calories or less)
Serving size: Entire recipe
Weight Watchers PointsPlus value: 10

Instructions


  1. Cook the chicken using your preferred method.
  2. While the chicken is cooking, add the lettuce, grated cheese, marinade, and croutons to a small bowl.
  3. When the chicken is finished, cut it into bite-sized pieces and add to the bowl. Toss until everything is evenly coated in marinade.
  4. Spread the mixture across the wrap and roll it tightly.


Nutritional Information


Sunday, March 29, 2015

Three-Ingredient Funfetti Cake Batter Dip

Tell me something - who doesn't like funfetti cake? It's so festive! Delicious white cake with colorful candy pieces? Yum! And everyone loves a good dip.

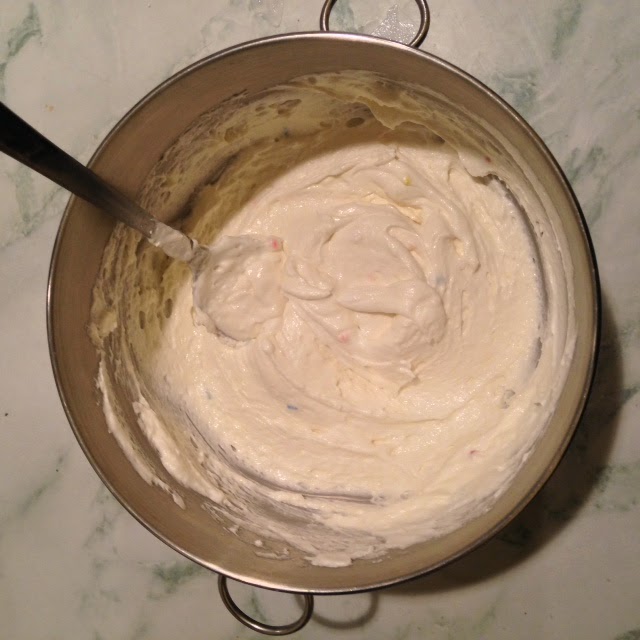
That's what makes this dessert so perfect. It combines the taste of funfetti cake with the appeal of a dip. And it is SO easy to make. As the title says - only three ingredients required!

All you need is Cool Whip, Greek yogurt, and funfetti cake mix!


Add the ingredients to a medium-sized bowl one at a time.


Mix to combine, and that's that!


If you want it to appear more "funfetti-like," you can add a tablespoon of rainbow sprinkles and if won't affect the nutrition in a significant way.


This dip is great as a party snack. Or, you can refrigerate it and eat a little bit each night by yourself (not gonna lie - this is what I've been doing). I came up with this recipe last week and I've already made and eaten an entire batch. Oops.

"Great!" you're probably thinking. "But what do I serve it with?" Umm, a spoon? Just kidding (not really - it's delicious and can very easily be eaten without dippers). If you want to serve it with something, there are plenty of options. If you want to keep it pretty healthy, apple slices or other fruits would be good. If you want more of a cookie to dip in it, I'd recommend choosing your favorite 100-calorie cookie pack. My preference is Keebler 100-calorie Chips Deluxe Chocolate Chip. Graham crackers would also work.

That's about it! As always, feedback/comments/suggestions are always appreciated!

Until next time!


Ingredients


  • 8 oz Cool Whip Free (one container)
  • 6 oz fat-free plain Greek yogurt (I used a container of Fage Total 0%)
  • 1/4 cup funfetti cake mix


Serving size: 1/4 of recipe
Weight Watchers PointsPlus value: 5 (Note: PointsPlus values are calculated by entering the recipe into the Weight Watchers recipe builder.)


Instructions


  1. Add all ingredients to a medium-sized bowl and mix to combine. (Optional: add 1 tbsp rainbow sprinkles).
  2. Refrigerate until ready to serve.

Nutritional Information


Saturday, March 21, 2015

Meatless Taco Bites

Happy weekend everyone! Is it just me, or did this week feel like a long one? Nevermind, though - the weekend is here and I thought I'd celebrate by posting a new recipe.

This one was inspired by my sister-in-law Tracey. She makes this AMAZING meatless taco dip - seriously, it's addicting. I can't seem to remove myself from the tray whenever she serves it. I've started making it whenever I host an event, and it's always a huge hit.

I usually serve the dip with Tostitos® Scoops!®, and it's so easy to just eat scoop after scoop of the delicious dip and lose track of exactly how much you've eaten (at least that's what I do). I wanted to try to revamp the recipe a little bit into a version that was easier to divide into pre-specified servings, without losing the deliciousness Tracey designed. Enter mini fillo shells, and the taco bites were created.


These are SO easy and SO delicious, and the best part is that they're so low-calorie that you can afford to eat a whole bunch in one sitting. The secret is using mini fillo shells, which are crispy and delicious but barely add any calories to the recipe.


Apologies again for my (lack of) photography skills. Maybe I'll get better as I continue to post. For now, though, I'll just post the recipe.


Ingredients


  • 30 mini fillo shells (2 boxes)
  • 4 oz fat free cream cheese, room temperature
  • 1/3 cup fat free salsa
  • 1/4 cup low fat Greek yogurt (I used Fage Total 2%)
  • 1/4 small red bell pepper, chopped into small pieces
  • 1/4 small green bell pepper, chopped into small pieces
  • 1/4 medium tomato, chopped into small pieces (I used a plum tomato)
  • 1/2 cup reduced fat Mexican style shredded cheese

Servings: 10 servings (3 taco bites each)
Weight Watchers PointsPlus value: 2 (for 3 taco bites)


Instructions


  1. Preheat the oven to 350 degrees. Place the empty shells on a baking sheet. Bake for 3-5 minutes. Remove from oven and let cool completely before filling. Note: This is an optional step. The shells come pre-baked and ready to fill, so all you need to do is let them defrost. Baking them adds a little extra crispiness, which I like, so that's why I included it as step 1. 
  2. In a small bowl, combine the cream cheese, salsa, and yogurt. Once combined, distribute the mix evenly among the cooled-off shells. TIP: If you're like me, and you forget to leave the cream cheese out to let it get to room temperature, just stick it in the microwave for about 30 seconds. That should do the trick.
  3. Sprinkle the chopped peppers and tomato over the shells. Top it off with the cheese, and you're done! Enjoy!


Super easy, really yummy, and guaranteed to be a crowd pleaser. As always, any feedback you have would be greatly appreciated!

Until next time!

Nutritional Information


Monday, March 16, 2015

Slimmed-Down Chicken Mozzarella Pasta

I wanted to post something extra delicious for my first recipe, and this is it. Chicken. Mozzarella. Pasta. With sun-dried tomatoes. And sauteed veggies. It's creamy, just the right amount of spicy, and filling.


Bear with me, my photography skills are somewhat lacking. And I was so excited to make this that I forgot to take pictures of the different steps along the way and only took a picture of the finished product. I'll try to do better next time, I promise.

I wish I could take full credit for this, but the original idea is from Julia's Album. Her Chicken Mozzarella Pasta with Sun-Dried Tomatoes looked SO good that I knew I needed to make it. I plugged the recipe into the Weight Watchers recipe builder, and the stats weren't bad - 14 PointsPlus for 1/4 of the recipe. For something so thick and filling, that's not that bad. But I wanted to see if I could get that a bit lower. So, here's my slimmed-down version!


Ingredients

  • No-stick cooking spray (like PAM)
  • 3 cloves garlic, minced
  • 3-4 oz sun-dried tomato halves (dry - not in oil)
  • 1 large red bell pepper, thinly sliced
  • 1/2 of a medium vidalia onion, thinly sliced
  • 4 oz ziti pasta (about 1 1/3 cups), cooked according to package directions and drained
  • 8 oz skinless boneless chicken breasts, cut into small pieces
  • Salt (to taste), to season chicken
  • Garlic powder (to taste), to season chicken
  • Paprika (to taste), to season chicken
  • 3/4 cup fat-free half and half
  • 1/4 cup low-fat plain Greek yogurt (I used Fage Total 2%)
  • 1 cup fat-free shredded mozzarella cheese
  • 1 tsp ground basil (or more to taste)
  • 1/4 tsp crushed red pepper flakes (or more to taste)
Servings: 4 medium servings or 3 large servings (nutritional information provided below for 1/3 of recipe)
Weight Watchers PointsPlus value: 7 (if you split into 4 servings) or 10 (if you split into 3 servings)

Instructions

  1. Spray a large pan or skillet with no-stick cooking spray and place over medium-high heat. Add the garlic, sun-dried tomatoes, bell pepper, and onion. Stirring frequently (but not constantly), cook until garlic is fragrant and vegetables are soft. TIP: If veggies start to stick to the pan, give them a quick spray with no-stick spray and stir.
  2. While the veggies are cooking, season the chicken with salt, garlic powder, and paprika.
  3. Once cooked, remove the veggies from the pan and transfer to a plate (you'll add them back in later). Place the pan back on the stove. Lower the heat to medium and add the chicken. Cook for about a minute on each side, flipping frequently as to not burn. When chicken is fully cooked, remove the pan from the heat.
  4. Add the cooked veggies to the pan with the chicken. Add the half and half, yogurt, and cheese. Return the pan to medium heat and stir to combine.
  5. When the mixture starts to boil, lower the heat. Stir constantly until the cheese melts and a creamy sauce forms.Add the cooked pasta and stir to combine. TIP: If sauce is too thick, add water, 1 tsp at a time, until desired consistency is reached.
  6. When the sauce is of the desired consistency, remove the pan from the heat. Season with basil and red pepper flakes and enjoy!

Since I'm just getting started, I'd love comments and/or feedback! If you have any questions about the recipe, or any suggestions on how I can make my posts better/more helpful, please let me know.


Until next time!

Nutritional information


Sunday, March 15, 2015

Welcome to Lighter Bites!

Well, I've finally done it - I've launched my recipe blog! This is something I've wanted to do for a while now. I'm still working out the kinks of blog design, but I'm at a point where I have enough done that I feel comfortable getting this running. So, without further ado, I'd like to briefly introduce myself and my blog - and then I'll be posting my first recipe!

Who am I?

Nice to meet you!

My name is Michele Springer. Pictured with me are my wonderful husband Ryan and our shiba inu Penny. I'd like to keep this short and sweet, so I'll just let you know a few things about me. I was born and raised on Long Island. I grew up in Lindenhurst, lived in an apartment in Oceanside for a few years, and currently reside in Bethpage. I know Long Island has its negatives, but you'll never convince me there's a better place to live. 

I graduated from Hofstra University in 2008 with a degree in English-Publishing Studies and a minor in Journalism. I worked as an editor at a non-fiction book publishing company for a few years. In 2010, I transitioned into the medical education field and I've been there ever since. Currently, I work as a Senior Medical Editor at a medical communications agency in NYC.

Outside of work, I lead a simple (but satisfying) life. I love to read, watch movies and TV, go out to eat, and spend time with my family and friends, who mean everything to me. I love music - my favorite bands are Adelita's Way, Shinedown, and Daughtry, and my favorite artist of all time is Billy Joel (my Long Island may be showing). People who know me would probably say I'm obsessed with my dog (can you blame me? Look how cute she is!) 

I met my husband in 2003 when we were both working at Hollywood Video (RIP). We started dating in 2005; moved in together, got engaged, and got our puppy in 2011; got married in 2012; and purchased our first house in 2013. Funny story - we actually grew up a block and a half away from each other (and even shared a bus stop in middle school) but didn't officially meet until we worked together. Funny how things work out sometimes! 

What's the backstory to this blog?

Back in 2010, after working full-time for a few years and settling into a happy relationship, I started noticing my clothes weren't fitting and looking as good as they used to. I signed up for Weight Watchers and lost 30 pounds! I kept it off for a while, but then got lazy and gained most of it back. Getting engaged was a good motivator - I lost the weight I gained (and then some). When I got married in October of 2012, I looked the best I've looked in years. Now, almost 2.5 years later, I'm carrying some newlywed weight (can I still call it that? I'm going to go with yes...) and I'd like to lose it once and for all. I'm a member of Weight Watchers again, and while I don't always stick 100% to the plan, I do my best and exercise as often as I can. Weight Watchers really does work, and I know with motivation and drive I can have success with the program again.

Why start a blog?

Simple! 

(1) I like food, and I love to cook. 
(2) I've been trying to get inventive lately, and I've been coming up with some of my own recipes. 
(3) I want to share my recipes with others. I've been posting some of my recipes on Instagram and getting good feedback, so I decided to give blogging a shot.

As I mentioned, I commute to the city for work. When I get home, I want to be able to enjoy a good dinner, but I don't want to spend hours in the kitchen preparing it. So, I can promise that the recipes I post here will be quick, easy, and low-calorie. Some recipes I've invented myself, and others are lightened-up versions of recipes I've found online. If I post an adapted recipe, I'll always post a link to the original.


So I guess that's that! I'll post my first recipe tomorrow, and I think it's one you guys will really enjoy.

Until then!