Saturday, September 26, 2015

Sweet and Cheesy Jalapeno Chicken Wontons

Sometimes you have an idea for a recipe in your head and it just doesn't work out. In your mind, the ingredients complement each other perfectly, but when you actually create it, the flavors don't mesh and you wind up with a mess on a plate. Sometimes recipe ideas just don't work out.

But sometimes they do.


One of my friends recently had a Tastefully Simple party. Have you ever been to one of those? I love their products (the beer bread is to DIE for). Most of their mixes and dips require just one or two additional ingredients (hence the "simple" in the name). Anyway, when I was flipping through the catalog I came across this Sweet Pepper Jalapeno Jam and had to buy it.


I've had sweet pepper jelly before. It's amazing with crackers and cream cheese. And in wontons.

After I bought the jelly, I was brainstorming ways to use it. I knew I wanted to pair it with cream cheese, but wasn't sure what else. Then it came to me. Chicken. And onions. And wanton wrappers. Boom.

This recipe is only a few ingredients, but it does involve a little more preparation than some of the other recipes I've posted. Not much more, though. It's definitely worth it.

I cook the chicken by poaching it. You need to shred it for this recipe, and I find it's easier to shred when it's poached. I didn't add any spices to the chicken, but you can.


Once it's shredded, add it to a bowl. Combine with the onions, jelly, and cream cheese.


Next comes the moderately time-consuming part: stuffing and sealing the wontons. Start by placing a wonton on a clean, dry surface (like a cutting board). Scoop about a 1/2 tbsp onto the center of the wonton - be careful not to scoop too much, or else it will be really tough to seal the wrapper.

Once the filling is on the wonton, fold it in half so it's triangle-shaped, with the filling sealed inside. Moisten your fingers (it helps to keep a small cup of water next to where you're working) and press down on the edges of the wrapper to seal them. You can cook them like this, or press the two bottom corners together to get that wonton shape (and moisten and press to seal) and cook that way.


Spray a baking sheet with no-calorie nonstick spray. Arrange the wontons on the sheet, spray the tops with nonstick spray, and bake at 400 degrees. After 5 minutes, flip the wontons and bake for another 4 minutes.


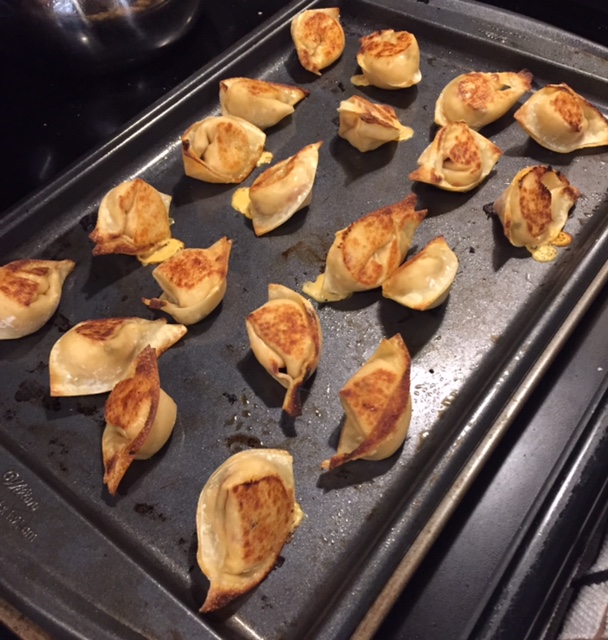
Enjoy! Serve warm, either plain or with sweet Asian chili sauce.

Until next time!

Ingredients

  • 1 boneless, skinless chicken breast, cooked and shredded (about 4.5-5 oz)
  • 1/4 cup finely chopped sweet onion
  • 3 tbsp sweet pepper jelly (I use Tastefully Simple, but you can use any brand)
  • 3 tbsp fat free cream cheese
  • 20 wonton wrappers (I use the ones by Nasoya - check the produce or tofu section at the grocery store)

Serving size: 4 wontons
Weight Watchers PointsPlus value: 3

Instructions

  1. Preheat the oven to 400 degrees.
  2. In a small bowl, combine the shredded chicken, onion, jelly, and cream cheese.
  3. Lay a wonton wrapper on a clean, dry surface. Scoop 1/2 tbsp of the chicken mixture onto the center of the wrapper (be sure not to overfill, or else it will be difficult to seal). Fold the wrapper in half to seal the filling inside. 
  4. Moisten the tips of your fingers and press the edges of the wrapper to seal. If you want to, you can then press and seal the two bottom corners together to give it a wonton shape (this isn't necessary, though - you can cook it in the triangle shape, too).
  5. Repeat for the remaining wrappers.
  6. Spray a baking sheet with no-calorie nonstick spray. Arrange the wontons on the baking sheet and spray the tops lightly with nonstick spray.
  7. Bake for 5 minutes, then remove from the oven, flip, and bake for an additional 4 minutes.
  8. Serve warm, either plain or with sweet Asian chili sauce.


Nutrition


Sunday, September 20, 2015

Kitchen Renovation: Part 2 (After)

I'm just going to come out and say it: I've been terrible at blogging lately. I've fallen WAY short of my goal to post at least one new recipe a week. And since we're on the honestly track right now, I have also been pretty terrible at living a Lighter Bites life. In addition to the kitchen renovation, this summer has been filled with plenty of BBQs and outdoor parties, yummy food, lots of drinks, and a bunch of trips and vacations on which I didn't count calories at ALL (we all know that calories don't count on vacation, right?)

But my favorite season - FALL! - is upon us, and I think it's the perfect time to fall back into a routine of exercising, eating healthy, and trying to meet my goal of creating and posting at least one new recipe a week. 

This post won't include a recipe, but I'm finally posting the AFTER photos of our kitchen renovation! My husband and I are absolutely thrilled with how it came out, and we hope you all like it too! In case you forgot what it used to look like, you can revisit the before pictures here.

The wall between the dining room and kitchen used to be fully closed, with just a doorway between. We opened it all up and look how much bigger it looks!


Open concept? Yes please!
The fridge used to be where the stove is now. Originally when the contractor suggested moving it here, I was dead against it. Well, I can admit I was wrong. It looks awesome, and the room feels so much bigger.


Our stove and microwave used to be on the end here, right next to the back door. And the dishwasher was right next to the sink, so you weren't able to open it if you were standing by the sink. The stove was moved to the other side of the counter (and the microwave was raised, because it was really low) and the dishwasher was shifted so we can open it now if we're washing dishes at the sink.


Look how much bigger everything looks!!!

I've got a little coffee nook now!
As you know, we renovated on a budget. We didn't replace any of the appliances, and we kept the floor. Lucky for us, the floor is in good condition and it's really neutral, so we weren't limited with our options. And I happen to really like the black appliances ... not saying we'll NEVER upgrade, but it won't be for a long, long time. 


And I had to get a close-up of the backsplash. How incredible is this beige subway tile?! I'm obsessed with it. It took a while to find it, but I absolutely love it.


Penny still gets her collar/leash caddy!

 Is it normal to be obsessed with a sink? Because I'm obsessed with this sink. 
 Better view of the new HUGE pantry and fridge area.


So open!

Love this little corner nook!
So there you have it! Our beautiful new kitchen! Can't wait to cook up some new recipes to share with you guys!

Until next time!

Saturday, September 5, 2015

Party-Size Shrimp and Crab Salsa

Drumroll, please - Lighter Bites is BACK! Thank you for sticking around through the hiatus while we had our kitchen redone! I'm not ready to share the after pictures quite yet ... we're having it painted on Monday, and then we just have to hang our decorations, and THEN I'll share the much-anticipated (okay, maybe not much-anticipated, but I'm excited) after photos.

It is, however, in good enough shape to cook and post recipes again! I'd love for my first recipe after a hiatus to be a Lighter Bites original, but I was making this Skinnytaste-inspired recipe for a BBQ tomorrow, and it's just too good not to share.


See the new countertops?! Eeeeee!
I've made some small tweaks and additions to the Skinnytaste recipe, but I have to give credit where it's due. This Skinnytaste recipe is amazing, and I think my version is pretty good too!

I've doubled everything in quantity because I'm bringing this to a BBQ tomorrow. It's so light and refreshing and perfect for summer!

I use cooked, peeled, frozen shrimp for this (and most shrimp-containing) recipes. It's easy to defrost - just let it sit in really hot water for a few minutes. The tails slide right off, and you can easily cut the shrimp into pieces.


I've also found that defrosting shrimp this way can add a lot of excess water to a recipe, so I've found a solution. I defrost and cut the shrimp first, and while I'm preparing everything else for the recipe, I let the shrimp sit in the colander in my sink to drain any excess water. It doesn't hurt to blot the shrimp with a paper towel, too.


Yep, we have a stainless steel sink now. No big deal.
The rest of the recipe is so easy. Combine all the remaining ingredients in a bowl, season to taste with seasoned salt, salt and pepper, and garlic powder, and mix to combine.


You can serve it right away (I like to serve this with pita chips - Wheat Thins makes an awesome pita chip) or refrigerate until you're ready to serve. Since there's seafood in this, I don't recommend refrigerating for longer than a day.

So that's about it! I'm so excited to be back blogging again and SO excited to share the new kitchen photos! Hope you enjoy this recipe (and don't forget to check out Skinnytaste's original and all her other stuff - she's amazing). 

Until next time!


Ingredients


  • 1.5 lbs cooked shrimp, peeled and chopped
  • 4 celery stalks, chopped
  • 3/4 medium-sized red onion, finely chopped
  • 2 medium-sized cucumbers, chopped
  • 4 scallions, chopped
  • 3/4 cup crab meat, chopped (I used imitation)
  • 1/4 cup low-fat mayonnaise
  • 2 tbsp fat-free plain Greek yogurt
  • Seasoned salt, to taste (I used Morton)
  • Salt and pepper, to taste
  • Garlic powder, to taste


Serving size: 1/8 recipe
Weight Watchers PointsPlus value: 3


Instructions

Combine all ingredients in a large bowl. Stir to combine (everything should be evenly coated with mayonnaise and yogurt). Serve immediately with pita chips, or refrigerate up to one day before serving.

Note: This recipe can easily be halved and served to a smaller gathering (4 instead of 8).


Nutritional Information