Sunday, September 20, 2015

Kitchen Renovation: Part 2 (After)

I'm just going to come out and say it: I've been terrible at blogging lately. I've fallen WAY short of my goal to post at least one new recipe a week. And since we're on the honestly track right now, I have also been pretty terrible at living a Lighter Bites life. In addition to the kitchen renovation, this summer has been filled with plenty of BBQs and outdoor parties, yummy food, lots of drinks, and a bunch of trips and vacations on which I didn't count calories at ALL (we all know that calories don't count on vacation, right?)

But my favorite season - FALL! - is upon us, and I think it's the perfect time to fall back into a routine of exercising, eating healthy, and trying to meet my goal of creating and posting at least one new recipe a week. 

This post won't include a recipe, but I'm finally posting the AFTER photos of our kitchen renovation! My husband and I are absolutely thrilled with how it came out, and we hope you all like it too! In case you forgot what it used to look like, you can revisit the before pictures here.

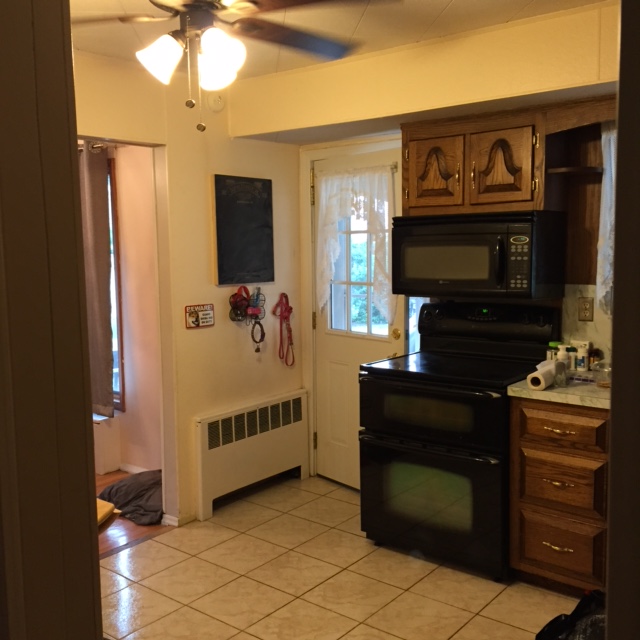
The wall between the dining room and kitchen used to be fully closed, with just a doorway between. We opened it all up and look how much bigger it looks!


Open concept? Yes please!
The fridge used to be where the stove is now. Originally when the contractor suggested moving it here, I was dead against it. Well, I can admit I was wrong. It looks awesome, and the room feels so much bigger.


Our stove and microwave used to be on the end here, right next to the back door. And the dishwasher was right next to the sink, so you weren't able to open it if you were standing by the sink. The stove was moved to the other side of the counter (and the microwave was raised, because it was really low) and the dishwasher was shifted so we can open it now if we're washing dishes at the sink.


Look how much bigger everything looks!!!

I've got a little coffee nook now!
As you know, we renovated on a budget. We didn't replace any of the appliances, and we kept the floor. Lucky for us, the floor is in good condition and it's really neutral, so we weren't limited with our options. And I happen to really like the black appliances ... not saying we'll NEVER upgrade, but it won't be for a long, long time. 


And I had to get a close-up of the backsplash. How incredible is this beige subway tile?! I'm obsessed with it. It took a while to find it, but I absolutely love it.


Penny still gets her collar/leash caddy!

 Is it normal to be obsessed with a sink? Because I'm obsessed with this sink. 
 Better view of the new HUGE pantry and fridge area.


So open!

Love this little corner nook!
So there you have it! Our beautiful new kitchen! Can't wait to cook up some new recipes to share with you guys!

Until next time!

Saturday, September 5, 2015

Party-Size Shrimp and Crab Salsa

Drumroll, please - Lighter Bites is BACK! Thank you for sticking around through the hiatus while we had our kitchen redone! I'm not ready to share the after pictures quite yet ... we're having it painted on Monday, and then we just have to hang our decorations, and THEN I'll share the much-anticipated (okay, maybe not much-anticipated, but I'm excited) after photos.

It is, however, in good enough shape to cook and post recipes again! I'd love for my first recipe after a hiatus to be a Lighter Bites original, but I was making this Skinnytaste-inspired recipe for a BBQ tomorrow, and it's just too good not to share.


See the new countertops?! Eeeeee!
I've made some small tweaks and additions to the Skinnytaste recipe, but I have to give credit where it's due. This Skinnytaste recipe is amazing, and I think my version is pretty good too!

I've doubled everything in quantity because I'm bringing this to a BBQ tomorrow. It's so light and refreshing and perfect for summer!

I use cooked, peeled, frozen shrimp for this (and most shrimp-containing) recipes. It's easy to defrost - just let it sit in really hot water for a few minutes. The tails slide right off, and you can easily cut the shrimp into pieces.


I've also found that defrosting shrimp this way can add a lot of excess water to a recipe, so I've found a solution. I defrost and cut the shrimp first, and while I'm preparing everything else for the recipe, I let the shrimp sit in the colander in my sink to drain any excess water. It doesn't hurt to blot the shrimp with a paper towel, too.


Yep, we have a stainless steel sink now. No big deal.
The rest of the recipe is so easy. Combine all the remaining ingredients in a bowl, season to taste with seasoned salt, salt and pepper, and garlic powder, and mix to combine.


You can serve it right away (I like to serve this with pita chips - Wheat Thins makes an awesome pita chip) or refrigerate until you're ready to serve. Since there's seafood in this, I don't recommend refrigerating for longer than a day.

So that's about it! I'm so excited to be back blogging again and SO excited to share the new kitchen photos! Hope you enjoy this recipe (and don't forget to check out Skinnytaste's original and all her other stuff - she's amazing). 

Until next time!


Ingredients


  • 1.5 lbs cooked shrimp, peeled and chopped
  • 4 celery stalks, chopped
  • 3/4 medium-sized red onion, finely chopped
  • 2 medium-sized cucumbers, chopped
  • 4 scallions, chopped
  • 3/4 cup crab meat, chopped (I used imitation)
  • 1/4 cup low-fat mayonnaise
  • 2 tbsp fat-free plain Greek yogurt
  • Seasoned salt, to taste (I used Morton)
  • Salt and pepper, to taste
  • Garlic powder, to taste


Serving size: 1/8 recipe
Weight Watchers PointsPlus value: 3


Instructions

Combine all ingredients in a large bowl. Stir to combine (everything should be evenly coated with mayonnaise and yogurt). Serve immediately with pita chips, or refrigerate up to one day before serving.

Note: This recipe can easily be halved and served to a smaller gathering (4 instead of 8).


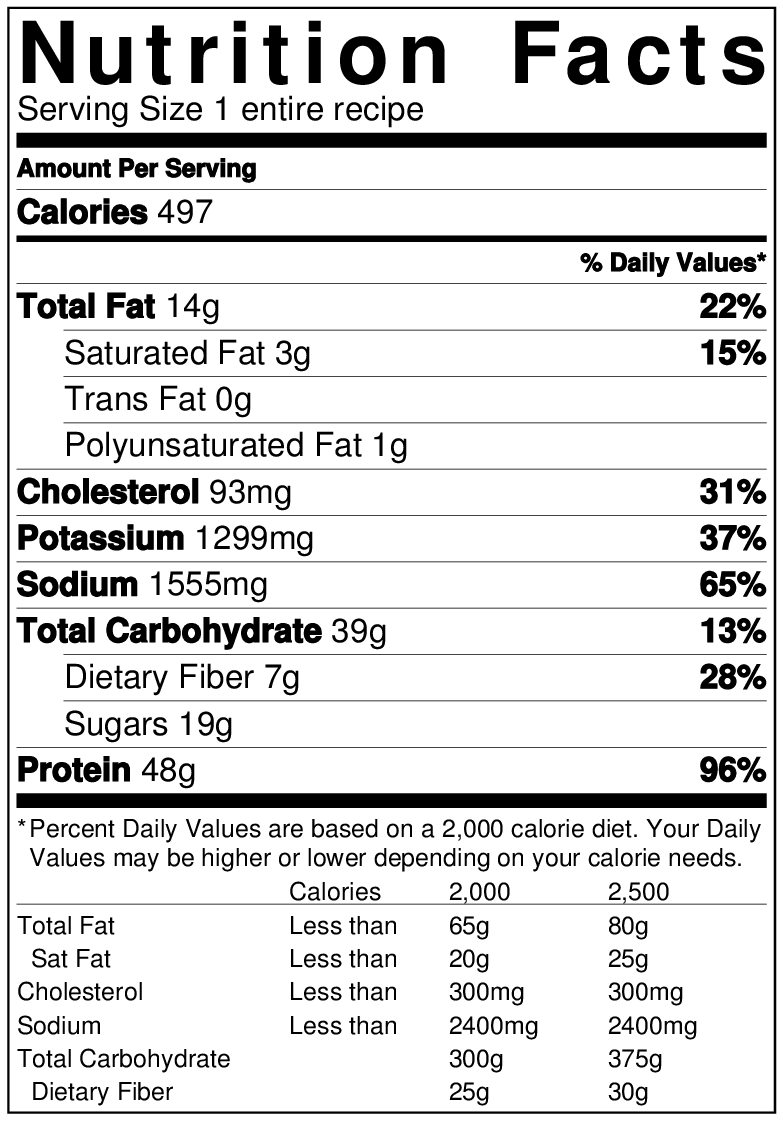
Nutritional Information


Wednesday, July 22, 2015

Kitchen Renovation: Part 1 (Before)

Hello lovely readers! Unfortunately, Lighter Bites HQ (aka my kitchen) is still out of commission. But I wanted to provide an update on how the renovation is going!

Some background info: we bought our house in 2013. It was built in 1953, and we think much of the kitchen was original (or updated in the 70s). Green formica countertops. Avocado green ceramic sink. Oak cabinets that were structurally great but so outdated and hard to look at. Gold hardware. PANELING!

See for yourself.


Yikes. I love the "whatnot" shelves next to the sink, though - shame we can't keep them!

Are you loving the sink?

So pretty.

No words.
The renovation isn't something we were planning on when we bought the house. We figured, sure, it's outdated. But we'll live with it. But then we had a leaky roof, which caused the ceiling in our bathroom to sag, so we fixed the roof and needed to fix the bathroom ceiling as well. We figured we might as well see how much new granite would cost us, and maybe we could replace our counter and sink when we fixed the bathroom ceiling.

As these things go, new granite/sink turned into new granite/sink + knocking out the wall between the kitchen and dining room and adding an island (I've been wanting to knock out the wall since we moved in). Which then turned into new granite/sink/half wall/island + replacing all the oak cabinets. And before we knew it, we had a contractor at the house drawing up plans. 

We knew off the bat that we were going to keep our appliances. They're not stainless steel, but they're black and relatively modern, and we knew we could make them work in a new kitchen. We knew we couldn't afford new appliances and a new kitchen. And we also decided to keep the floor. The tiles are neutral and nice, and when the reno is done, we'll have the grout cleaned and they'll look as good as new.

Our contractor, who is a family friend and did all the work my parents have had done on their house, proposed some things we hadn't thought of. He suggested rearranging our appliances to make the kitchen seem bigger and get more counter space than we would have if we just replaced the existing counter. I took some convincing, but once I found out I could still get my half wall, I was sold.

And before we knew it, we were out shopping for granite and cabinets.


View from the dining room. Bye-bye, wall!

Can't wait to be able to stand here and see into the dining room and living room!

So very outdated. The fridge and pantry are moving to the wall where the (unused) kitchen table currently is.

The stove and microwave will be moved to where the fridge is, and this will be ALL COUNTER.
We fell in love with a granite called Black Galaxy, which will look amazing with our black appliances (and if we ever have the money to upgrade, it'll look amazing with stainless steel too). We picked out these gorgeous wood cabinets with black etching to match the counter and ordered oil-rubbed bronze hardware to tie it all together.

There are still some question marks about the whole process. We don't have a backsplash yet. I know exactly what I want (neutral beige subway tile), and I found and ordered the perfect one only to find out it was discontinued, so we're still looking for that. We ended up re-sheetrocking the entire kitchen, which wasn't part of the original plan, so we'll need to have the new walls painted (along with the bathroom ceiling, which will need to be painted, too). I'm not complaining though - out kitchen was paneling! Sheetrock is so much nicer. And we're still figuring out what to do about the light fixture. The light isn't in the center of the room, so we either need to have it moved or find a light fixture that works with the new cabinets.

But everything is coming along nicely and I can't wait to show you all the finished product! And, of course, start making some food in this new kitchen and share some more recipes with you guys!

I may tweet or Instagram some in-progress shots (links to the Lighter Bites Twitter and Instagram are on the right side of the page) but I think I'll save the next blog for the finished kitchen (or mostly finished, since I don't know how long backsplash, etc will take).

But for now, I'll leave you with this: Penny, the cutest dog in the WORLD, all confused and adorable about the construction.


What the hell is going on my house?!
Until next time!

Saturday, July 4, 2015

Lightened-Up Texas Toast

Happy Independence Day, everyone! Sorry for the long hiatus between my last post and this one - work has been busy, and I've taken on some freelance work as well, so things have been a bit crazy. I hope everyone has something fun planned for the holiday today! Me? I'll be relaxing at my in-laws' house, spending time with good people and eating good BBQ'd food (today will probably NOT be a diet-friendly day, but what can you do).

Anyway, I wanted to share this SUPER SIMPLE recipe for Texas toast with you! I was trying to think of a clever line about Texas being American and that's why I decided to wait until July 4th to share this recipe, but the truth is, this recipe has nothing to do with Independence Day. It's just really easy and delicious and you should make it ASAP.


My husband found Texas toast in the supermarket a few years ago. It's basically thick garlic bread, toasted, and covered in melted cheese. It's amazing, but definitely not amazing for someone who is trying to count calories. So a few weeks ago, I was having grilled chicken for dinner, and I wanted something on the side. My husband, who for some reason (like most men I know) doesn't have to worry about his weight, was making the store-brand Texas toast with his dinner, and it looked REALLY good. So I opened my fridge and saw that I had some English muffins, and I decided to see what I could do.

I toasted an English muffin, then covered each part with I Can't Believe It's Not Butter spray. Zero-calorie butter spray can be your best friend in recipes. Personally, I don't think it's tasty enough on its own to have with nothing else (I'd never eat toast with butter spray and nothing else) but it's good when paired with something else. For example, toast with butter spray and jelly, toast with butter spray and cinnamon sugar, etc. And in this recipe, it works perfectly.


Next, I sprinkled (pretty generously) garlic powder on top of the spray. Then I took some part-skim mozzarella and spread it across the top of the garlic. Pop it in the oven at 375 for about 5 minutes until the cheese melts, and there you have it - easy, delicious, lightened-up Texas toast.


I made my husband try it - he approves! He'll probably continue to eat the "good stuff" from the supermarket because he can, but I'm happy he approves of my lighter version too.

That's it! Make this the next time you have chicken or pasta and let me know what you think!

Until next time!


Ingredients


  • 2 Fiber One English muffins
  • I Can't Believe It's Not Butter Spray (roughly 32 sprays)
  • Garlic powder (to taste)
  • 2 oz part-skim mozzarella cheese


Serving size: 2 pieces (half of recipe)
Weight Watchers PointsPlus value: 5


Instructions


  1. Preheat the oven to 375 degrees.
  2. Toast each English muffin to desired crispiness.
  3. Spray each muffin half with butter spray. The recipe calls for ~32 sprays, or 8 per piece of toast, because I like mine extra buttery. Feel free to use more or less as desired. Sprinkle garlic powder over the top of each piece.
  4. Distribute the cheese evenly among the pieces of toast. I've been using the mozzarella blocks lately, so I measure out 2 oz on my food scale and then slice it into small pieces and distribute them among the pieces. If you use shredded cheese, this will probably be easier to measure. Either way, each piece of toast gets about half an ounce of cheese.
  5. Put the toast on a baking sheet and pop it in the oven for 5 minutes, or until the cheese looks melted but not burnt. (TIP: I like to put a piece of tin foil on my baking sheet to eliminate mess).
  6. Let cool slightly, and enjoy!


Nutritional Information


Saturday, June 20, 2015

Skinny Chicken BLT Quesadilla

I used to be a weird person who didn't like bacon. I'm still kind of picky about it - I don't like when it's too crispy and I'd rather eat it as a part of a sandwich or inside a recipe than on its own, but I've finally come to love bacon and the flavor it brings to so many dishes.

And I absolutely love a good BLT.


For those of you who don't know, BLT stands for bacon, lettuce, tomato (just covering my grounds here)! It's usually served on a roll or wrap with a ton of mayo and it's delicious. Not the healthiest option, though.

Until now.

By using low-fat mayo, center-cut bacon, and a toasted low-cal wrap, you can eliminate a lot of the fat and calories associated with a traditional BLT. And it tastes just as good, promise! I even added some grilled chicken for extra protein and to bulk this up so it can be eaten for dinner as a meal.

Start by spreading the mayo across the wrap. Layer the lettuce, tomato, and onion across one half of the wrap. 


Next, add the bacon. I cook mine in the microwave. It's easy, fast, and eliminates splatter (nothing worse than being burnt by bacon grease while cooking on the stove). Just put a paper towel on a microwave-safe dish, place your bacon on the paper towel, and place another paper towel on top. Microwave for 60-90 seconds (depending on how crispy you like it) and then crumble it over the wrap.


Next, add the chicken. I seasoned mine with salt,.pepper, and garlic and cooked it on the Foreman grill (8-10 minutes on 375 degrees) but you could also cook it on the stove or grill it - whichever you prefer. Slice the chicken and spread it across the wrap. Sprinkle with salt and pepper.


Now, the hard part - transferring the wrap to the grill. I really recommend using a Foreman is you have one - this way both sides will be grilled at the same time. You can grill the wrap on the stove, but you'll have to keep flipping it and it might be hard to keep everything inside of it. Once it's safely on the grill, fold the half not covered in filling over the other half and let it grill!


I kept my grill on 375 and let it go for about 8 minutes. 


This definitely needs to be eaten with a knife and fork. Anything else would be way too messy! I had mine with a little fat free ranch dressing on the side for dipping, but it doesn't need it.

That's it! Hope you enjoy, and as always, feedback is appreciated!

Until next time!


Ingredients


  • 1 low-calorie wrap (I used a Fiber One 80-calorie white wrap)
  • 2 tbsp low-fat mayonnaise 
  • 1/2 cup lettuce (I used romaine)
  • 6 cherry tomatoes, sliced thin
  • 1/4 sweet onion, sliced thin
  • 3 slices center cut bacon (I used Oscar Mayer)
  • 1 5-oz boneless, skinless chicken breast, cooked 
  • Salt and pepper, to taste


Serving size: entire recipe
Weight Watchers PointsPlus value: 8


Instructions


  1. If you'll be using a foreman to cook this, preheat it to 375.
  2. Lay the wrap on a plate and spread the mayo across it. Arrange the lettuce, tomato, and onion across half of the wrap. 
  3. Cook the bacon in the microwave according to package instructions. Crumble on top of the veggies.
  4. Take the cooked chicken and slice it (I grilled my chicken on the Foreman, but you can cook it on the stove or the grill). Arrange the chicken on top of the bacon. Sprinkle the whole thing with salt and pepper.
  5. Transfer the wrap to the grill (I recommend using a Foreman so you don't need to flip it). Cook for 8-10 minutes. If you're using a pan on the stove, spray the pan with no-calorie cooking spray and flip continuously until the wrap is equally browned on each side.
  6. Transfer to a plate. Let cool for a few minutes, then enjoy!


Nutritional Information